
This tutorial is based on Ti SDK 3.0.0, which is outdated. I have a new blog post based on Ti SDK 3.1.3GA using GCM.
What is Push Notification?
Push notification allows an app to notify you of new messages or events without the need to actually open the application, similar to how a text message will make a sound and pop up on your screen. This is a great way for apps to interact with us in the background, whether it be a game notifying us of some event occurring in our game world or simply the iPad's mail application beeping as a new message appears in our inbox. read more
Push Notification in Titanium Using Cloud Service
We can achieve Push Notification in Titanium using Appcelerator Cloud Service in 5 steps.
Cloudpush provides methods for accessing Android push notifications from ACS using the MQTT protocol. require cloudpush in your app and add module in your tiapp.xml

2)Retrieve Device Token
You can Retrieve Device Token using below code
Before subscribe for Push Notification, cloud user should logged in.
So create a test user in Appcelerator Cloud Console
My Apps -> Manage ACS -> DEVELOPMENT -> Users
and login with credential. Use below code for cloud user login

Add following code for channel subscribtion
It is final step. In Appcelerator Cloud Console go to
My Apps -> Manage ACS -> DEVELOPMENT -> Settings/Android Push Configuration and enter the Application Package in the text box. Your pakage name should be similar to com.xxx.androidpush Here xxx is company name and androidpush is Application name
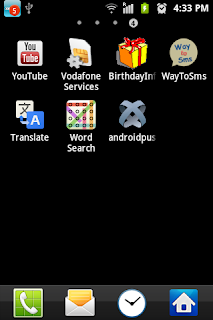
 Cool.., You have completed Android Push Notification setup(Here is the whole sample code). This time for testing, run the application in android device and click the button "Android Cloud Push Notification". You will get 3 alerts continuously.
Then go to My Apps -> Manage ACS -> DEVELOPMENT -> Push Notifications, here you can see "1 Android clients subscribed to push notifications"

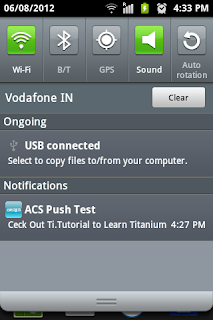
It is time to send push notification, enter the values and hit the button "Send Push Notification" instantly you will receive notification in your Android device(with default icon and sound)
How to customize ACS Push notification?
Here you can use use your custom sounds and icons.
Icon
custom icons must be placed in below directory
App_root/platform/android/res/drawable/myicon.png
Here "myicon.png" is custom icon, specified in the push message without the filename extension. For example: in icon text box enter the file name without extension(myicon)
Sound
Custom sound must be placed in below directory
app_root/platform/android/assets/sound/beep.wav
Here "beep.wav" is custom sound, specified in the push message with the filename extension. For example: in custom sound text box you have to enter sound filename with extension(beep.wav). Here is the screens of custom notification
 >
>
Here you can download the complete working project from my Github Appcelerator Titanium Android Push Notification
If anyone found difficulties in push notification implementation feel free to contact me
CodeStrong
Push notification allows an app to notify you of new messages or events without the need to actually open the application, similar to how a text message will make a sound and pop up on your screen. This is a great way for apps to interact with us in the background, whether it be a game notifying us of some event occurring in our game world or simply the iPad's mail application beeping as a new message appears in our inbox. read more
Push Notification in Titanium Using Cloud Service
We can achieve Push Notification in Titanium using Appcelerator Cloud Service in 5 steps.
- Cloudpush Module Implementation
- Retrieve Device Token
- Cloud User Login
- Subscribe a Channel
- Push Configuration
Cloudpush provides methods for accessing Android push notifications from ACS using the MQTT protocol. require cloudpush in your app and add module in your tiapp.xml
// add this line in tiapp.xml
<module platform="android">ti.cloudpush</module>
// add this line in app.js
var CloudPush = require('ti.cloudpush');

2)Retrieve Device Token
You can Retrieve Device Token using below code
  CloudPush.retrieveDeviceToken({
          success: function deviceTokenSuccess(e) {
              alert('Device Token: ' + e.deviceToken);
              deviceToken = e.deviceToken
          },
          error: function deviceTokenError(e) {
              alert('Failed to register for push! ' + e.error);
       }
  });
3)Cloud User Login
Before subscribe for Push Notification, cloud user should logged in.
So create a test user in Appcelerator Cloud Console
My Apps -> Manage ACS -> DEVELOPMENT -> Users
and login with credential. Use below code for cloud user login

    Cloud.Users.login({
        login: 'push123',
        password: 'push123'
    }, function (e) {
        if (e.success) {
            alert("login success");
        } else {
            alert('Error: ' +((e.error && e.message) || JSON.stringify(e)));
        }
   });
4)Subscribe a ChannelAdd following code for channel subscribtion
             Cloud.PushNotifications.subscribe({
                 channel: 'alert', // "alert" is channel name
                 device_token: deviceToken,
                 type: 'android'
             }, function (e){
                 if (e.success) {
                    alert('Subscribed for Push Notification!');
                 }else{
                     alert('Error:' +((e.error && e.message) || JSON.stringify(e)));
                 }
             });
5)Android Push Configuration
It is final step. In Appcelerator Cloud Console go to
My Apps -> Manage ACS -> DEVELOPMENT -> Settings/Android Push Configuration and enter the Application Package in the text box. Your pakage name should be similar to com.xxx.androidpush Here xxx is company name and androidpush is Application name
Then go to My Apps -> Manage ACS -> DEVELOPMENT -> Push Notifications, here you can see "1 Android clients subscribed to push notifications"

It is time to send push notification, enter the values and hit the button "Send Push Notification" instantly you will receive notification in your Android device(with default icon and sound)
How to customize ACS Push notification?
Here you can use use your custom sounds and icons.
Icon
custom icons must be placed in below directory
App_root/platform/android/res/drawable/myicon.png
Here "myicon.png" is custom icon, specified in the push message without the filename extension. For example: in icon text box enter the file name without extension(myicon)
Sound
Custom sound must be placed in below directory
app_root/platform/android/assets/sound/beep.wav
Here "beep.wav" is custom sound, specified in the push message with the filename extension. For example: in custom sound text box you have to enter sound filename with extension(beep.wav). Here is the screens of custom notification
>Here you can download the complete working project from my Github Appcelerator Titanium Android Push Notification
If anyone found difficulties in push notification implementation feel free to contact me
CodeStrong


 https://twitter.com/techday7
 https://www.facebook.com/TECHDAY7