Ads

Monday, July 16, 2012

Appcelerator Titanium Chennai Event

Hello Friends,

We are coming back with another Appcelerator Titanium event in Chennai. This time we are coming with "Cross Platform Mobile Strategy", we have two speakers

1. Kevin Whinnery, Chief Technical Evangelist from Appcelerator.
2. Sivakumar Veerappan, CEO from Anubavam.

Agenda:

6:00 P.M: Registration and Networking

6:30 P.M: Introductions to available Cross Platforms, AppC and Titanium framework: by Sivakumar Veerappan, CEO, Anubavam

6:45 P.M: The Appcelerator Mobile Platform: Full Stack, Cross-Platform, and Incredibly Fast: By Kevin Whinnery, Chief Technical Evangelist, Appcelerator

Titanium Mobile has revolutionized mobile development by empowering top-quality native application development for iOS and Android from a single JavaScript codebase.  For Appcelerator, this is only the beginning.  Our goal is to provide the first and best full-stack development platform for mobile applications.  Appcelerator integrates an open source, cross-platform mobile development SDK, cloud services, application analytics, and development tools into the most productive, feature-rich mobile development platform around.

In this session, Kevin will discuss where the Appcelerator platform is today, and where it's going in the future.  We will also do a technical deep dive on the latest improvements and additions to the Appcelerator platform, including the core native platforms, mobile web, and cloud services.  As always, we'll have plenty of time for Q&A and digging deeper into the features and topics you want to explore.

8:30: Dinner


Date: 18 July 2012

Time: 06:00 P.M to 08:30 P.M

Venue: Fortune Select Palms
          142, Rajiv Gandhi Salai,
          Old Mahabalipuram Road,
          Thoraipakkam,
          Chennai – 600096

You can RSVP for this event here http://www.meetup.com/Chennai-Titanium-User-Group/events/73255942/

Don't forget to confirm your seats before coming..


For more details contact
04465180342, 9994526041

Regards,
Ramkumar Murugadoss
Wednesday, July 4, 2012

Appcelerator Cloud Push Notification in iPhone


Push Notification in iOS Using Appcelerator Cloud Service

We can implement Push Notification in iOS using Appcelerator Cloud Service in 5 steps.
  1. Cloud User Login
  2. Retrieve Device Token
  3. Subscribe a Channel
  4. Push Certificates
  5. Push Configuration 

1)Cloud User Login
Create a test user in Appcelerator Cloud Console 
My Apps -> Manage ACS ->  DEVELOPMENT ->  Users
and login with credential. Use below code for cloud user login

Appcelerator Cloud Push Notification in iPhone

 
    var Cloud = require('ti.cloud');

    Cloud.Users.login({
        login: 'push123',
        password: 'push123'
    }, function (e) {
    if (e.success) {
    var user = e.users[0];
     alert("Loggin successfully");
        } else {
            alert("Error :"+e.message);
        }
    });
 
2)Retrieve Device Token
You can Retrieve Device Token using below code
 

    Titanium.Network.registerForPushNotifications({
        types: [
            Titanium.Network.NOTIFICATION_TYPE_BADGE,
            Titanium.Network.NOTIFICATION_TYPE_ALERT,
            Titanium.Network.NOTIFICATION_TYPE_SOUND
        ],
    success:function(e)
    {
        deviceToken = e.deviceToken;
        alert("deviceToken = "+deviceToken);
        registerForPush();
    },
    error:function(e)
    {
        alert("Error: "+e.message);
    },
    callback:function(e)
    {
        alert("push notification received"+JSON.stringify(e.data));
    }
    });


3)Subscribe a Channel
Add following code for channel subscribtion
 
    Cloud.PushNotifications.subscribe({
        channel: 'demo_alert',
        type:'ios',
        device_token: deviceToken
    }, function (e) {
        if (e.success) {
            alert('Success :'+((e.error && e.message) || JSON.stringify(e)));
        } else {
            alert('Error:' + ((e.error && e.message) || JSON.stringify(e)));
        }
    });

4)Push Certificates
It is most important part of this Tutotial, Appcelerator Doc clearly expained about how to create push certificates. http://cloud.appcelerator.com/docs/ios#push
Follow this section("Provisioning your Device for specialized Development") to create Development and Production Push certificates. Your certificates should be in .p12 format.

5)Push Configuration
After getting the push certificates(in my case I have created development push certificate), upload it in cloud console. 
My Apps -> Manage ACS ->  DEVELOPMENT ->  Settings -> Apple iOS Push Certificates

Appcelerator Cloud Push Notification in iPhone


Cool.., You have completed  Push Notification setup. This time for testing, run the application in iOS device and click the button "REGISTER PUSH NOTIFICATION". You will get 3 alerts continuously.

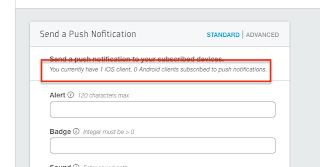
Then go to My Apps -> Manage ACS -> DEVELOPMENT -> Push Notifications, here you can see "1 iOS clients subscribed to push notifications"


 It is time to send push notification, enter the values and hit the button "Send Push Notification" instantly you will receive notification in your iOS device(with default icon and sound)

Appcelerator Cloud Push Notification in iPhone
Push Notification in iPad

Appcelerator Cloud Push Notification in iPhone
Push Notification Callback


Here you can download the complete working project from my Github Appcelerator Titanium iOS Push Notification

If anyone found difficulties in push notification implementation feel free to contact me

CodeStrong


Monday, July 2, 2012

Titanium Layout

In Titanium, windows and views have layout property. There are three types of Layout available in Titanium
  1. Composite or Absolute (default)
  2. Vertical
  3. Horizontal
Composite or Absolute (default)
It is default layout. A child view is positioned based on its positioning properties(top, bottom, left, right and center). If no positioning properties are specified, the child is centered.
var win = Ti.UI.currentWindow;

var label1 = Ti.UI.createLabel({
    text : 'Sample Text 1',
    color : 'blue',
    height : 40,
    width : 180,
    top : 100,
    left : 60,
    font:{fontSize:14, fontWeight:'bold'},
    textAlign : 'center'
});
win.add(label1);

var label2 = Ti.UI.createLabel({
    text : 'Sample Text 2',
    color : 'blue',
    height : 40,
    width : 180,
    top : 160,
    left : 60,
    font:{fontSize:14, fontWeight:'bold'},
    textAlign : 'center'
});
win.add(label2);

var label3 = Ti.UI.createLabel({
    text : 'Sample Text 3',
    color : 'blue',
    height : 40,
    width : 180,
    top : 220,
    left : 60,
    font:{fontSize:14, fontWeight:'bold'},
    textAlign : 'center'
});
win.add(label3);

Vertical
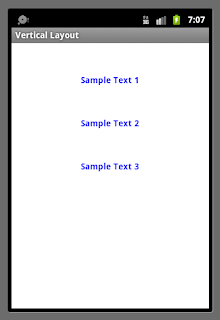
In vertical layout all children are ordered one below the other(top to bottom). All child sandboxes have the same width (set to the parent's width).

The first child is laid out top units from its parent's bounding box. Each subsequent child is laid out below the previous child. The space between children is equal to the upper child's bottom value plus the lower child's top value.
var win = Ti.UI.currentWindow;
    win.layout = "vertical";

var label1 = Ti.UI.createLabel({
    text : 'Sample Text 1',
    font:{fontSize:14, fontWeight:'bold'},
    color : 'blue',
    top : 50
});
win.add(label1);


var label2 = Ti.UI.createLabel({
    text : 'Sample Text 2',
    font:{fontSize:14, fontWeight:'bold'},
    color : 'blue',
    top : 50
});
win.add(label2);


var label3 = Ti.UI.createLabel({
    text : 'Sample Text 3',
    font:{fontSize:14, fontWeight:'bold'},
    color : 'blue',
    top : 50
});
win.add(label3);

Horizontal
In horizontal layout all children are ordered next to each other in a row.
All children in a row have the same sandbox height.

Here children are laid out horizontally from left to right, in rows. If a child requires more horizontal space than exists in the current row, it is wrapped to a new row. The height of each row is equal to the maximum height of the children in that row.
var win = Ti.UI.currentWindow;
    win.layout = "horizontal";

var label1 = Ti.UI.createLabel({
    text : 'Sample Text 1',
    font:{fontSize:14, fontWeight:'bold'},
    color : 'blue',
    left:10
});
win.add(label1);

var label2 = Ti.UI.createLabel({
    text : 'Sample Text 2',
    font:{fontSize:14, fontWeight:'bold'},
    color : 'blue',
    left:10
});
win.add(label2);

var label3 = Ti.UI.createLabel({
    text : 'Sample Text 3',
    font:{fontSize:14, fontWeight:'bold'},
    color : 'blue',
    left:10
});
win.add(label3);

CODESTRONG