Ads

Thursday, November 28, 2013

Android Multi Image Picker Module

Multi Image Picker module helps to select multiple images from Gallery.

This module developed from existing Android open source library MultipleImagePick. And it uses Universal image loader library for asynchronous loading and caching.

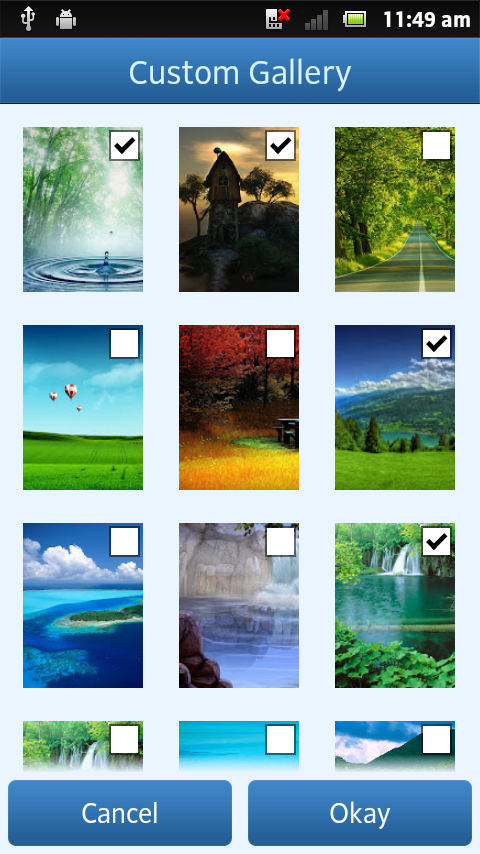
Multiple Image Picker Screen

Features and Benefits:
  • Select multiple images - Option to select multiple images from Gallery and fast scroll over the Gallery
  • Maximum selection limit - Option to set maximum image selection limit
  • Custom button title and error message - There is a option to customize button title and error message
  • Method for scale down the bitmap - To avoid out of memory issue, this module has in build bitmap scale down method
  • Callback methods - Success, error and cancel callback methods

Usage: 
var gallerypicker = require('titutorial.gallerypicker');
gallerypicker.openGallery({
    cancelButtonTitle: "Cancel",
    doneButtonTitle: "Okay",
    title: "Custom Gallery",
    errorMessage: "Limit reached",
    limit: 10,
    success: function (e) {
        Ti.API.info("response is => " + JSON.stringify(e));
        var imgArray = e.filePath.split(",");

        for (var i = 0; i < imgArray.length; i++) {
            if (imgArray[i]) {
                var imgView = Ti.UI.createImageView({
                    left: '10dp',
                    top: '10dp',
                    image: gallerypicker.decodeBitmapResource(imgArray[i], 100, 100)
                });
                imageHolder.add(imgView);
            }
        }
    },
    error: function (e) {
        alert("error " + JSON.stringify(e));
    }
});

Download:
Source code : https://github.com/railskarthi/TiMultiImagePicker
Module : https://marketplace.appcelerator.com/apps/7215?1782767416

Tuesday, November 5, 2013

Android Module Development - Part 5

This is the follow up post from Android Module Development series. Today I am
going to continue with next topic which is Using XML layouts in modules.
  1. Understanding methods, properties, constants and module life cycle
  2. Using event listeners and callbacks in Module
  3. Converting native control into Titanium view
  4. Accessing module and app resources
  5. Using XML layouts in modules
Usually in native Android development, we will define out user interface and layouts in xml file. Same thing we can implement in Titanium Android module also. For that we have to use LayoutInflater.

LayoutInflater class is used to instantiate layout XML file into its corresponding View objects. In other words, it takes as input an XML file and builds the View objects from it.

Lets consider our RatingBar module, here I am using xml layout file (raingbar_layout.xml) to create RatingBar with custom styles. In module I can access the xml layout elements in following way
//declaration
View raingBarWrapper;
int resId_raingBarHolder = -1, resId_ratingBar = -1;

//fetching app package name and resources 
String packageName = proxy.getActivity().getPackageName();
Resources resources = proxy.getActivity().getResources();

//fetching resource id
resId_raingBarHolder = resources.getIdentifier("raingbar_layout", "layout", packageName);
resId_ratingBar = resources.getIdentifier("ratingbar_default","id", packageName);

LayoutInflater inflater = LayoutInflater.from(getActivity());
//inflating "raingbar_layout" xml file
raingBarWrapper = inflater.inflate(resId_raingBarHolder, null);

//getting reference to RatingBar component in layout
ratingBar = (RatingBar) raingBarWrapper.findViewById(resId_ratingBar);
setNativeView(raingBarWrapper);

//adding properties to RatingBar component
ratingBar.setNumStars(stars);
ratingBar.setStepSize(stepSize);
ratingBar.setRating(rating);

XML layout file (raingbar_layout.xml)


Source Code:
You can download entire RatingBar module source code here https://github.com/railskarthi/Ratingbar

Thursday, October 24, 2013

Android Module Development - Part 4

This is the follow up post from Android Module Development series. Today I am going to continue with next topic which is Accessing module and app resources.
  1. Understanding methods, properties, constants and module life cycle
  2. Using event listeners and callbacks in Module
  3. Converting native control into Titanium view
  4. Accessing module and app resources
  5. Using XML layouts in modules
In Android module we can able to access resources from both module and application.

1. Accessing resource from Module
Let assume that you have few image resource in your module directory and if you want to access them, you can do that in following way
//creating new button
Button moduleButton = new Button(proxy.getActivity());  
moduleButton.setText("Image from module");  
moduleButton.setTextSize(20);  

//since we can't access R.java in Titanium module, we are getting the 
//resource id using packageName and resource type
String packageName = proxy.getActivity().getPackageName();
Resources resources = proxy.getActivity().getResources();

//getIdentifier method will return the resource id 
int textStyle = resources.getIdentifier("facebook_loginbutton_blue", "drawable", packageName);
moduleButton.setBackgroundResource(textStyle);

2. Accessing resource from Application
For example if you want to pass an image resource from your application to module, you can do that in following way
//creating new image button
ImageButton appButton = new ImageButton(proxy.getActivity());  

//getting the blob object of the application image
TiBlob imgObj = loadImageFromApplication(imageUrl);

//creating the bitmap from the blob object
TiDrawableReference ref = TiDrawableReference.fromBlob(proxy.getActivity(), imgObj);
appButton.setImageBitmap(ref.getBitmap());
Here loadImageFromApplication method takes input as image file path and it convert the application image into blob object.
public TiBlob loadImageFromApplication(String imageName) {
 TiBlob result = null;
 try {
  // Load the image from the application assets
  String url = getPathToApplicationAsset(imageName);
  TiBaseFile file = TiFileFactory.createTitaniumFile(
    new String[] { url }, false);
  Bitmap bitmap = TiUIHelper.createBitmap(file.getInputStream());

  // The bitmap must be converted to a TiBlob before returning
  result = TiBlob.blobFromImage(bitmap);
 } catch (IOException e) {
  Log.e(TAG, " EXCEPTION - IO");
 }
 return result;
}
Here getPathToApplicationAsset method takes input as image file path and it locates the resource relative to the application resources folder. It return the application asset url.
private String getPathToApplicationAsset(String assetName) {
 // The url for an application asset can be created by resolving the specified
 // path with the proxy context. This locates a resource relative to the
 // application resources folder
 String result = resolveUrl(null, assetName);

 return result;
}
In Javascript layer
var demo3 = require('titutorial.demo3');
var proxy = demo3.createExample({
 imageUrl : "icon.png"
});
win.add(proxy);
Source Code:
You can download entire module source code here https://github.com/TiTutorial/demo-android-module-3

Continue with part 5 

Thursday, October 17, 2013

Android Module Development - Part 3

This is the follow up post from Android Module Development series. Toady I am going to continue with next topic which is Converting native control into Titanium view.
  1. Understanding methods, properties, constants and module life cycle
  2. Using event listeners and callbacks in Module
  3. Converting native control into Titanium view
  4. Accessing module and app resources
  5. Using XML layouts in modules

In Titanium module we can convert native controls into Titanium view using  setNativeView method. setNativeView sets the nativeView to view.

For example, here I am going to convert Android native RatingBar extension to titanium view. Add below code in your ExampleProxy.java file

RatingBar rb;

private class ExampleView extends TiUIView {
 public ExampleView(TiViewProxy proxy) {
  super(proxy);

  // layoutParams for holder view
  LayoutParams lp = new LayoutParams(LayoutParams.WRAP_CONTENT,
    LayoutParams.WRAP_CONTENT);
  // holder view
  LinearLayout holder = new LinearLayout(proxy.getActivity());
  holder.setLayoutParams(lp);

  // ratingbar widget
  rb = new RatingBar(proxy.getActivity());
  rb.setNumStars(5);
  rb.setStepSize(1);
  rb.setRating(2);

  // adding ratingbar to holder view
  holder.addView(rb);
  // setNativeView sets the nativeView to ratingbar view
  setNativeView(holder);
 }

 @Override
 public void processProperties(KrollDict d) {
  super.processProperties(d);
 }
}
In Javascript
var demo2 = require('titutorial.demo2');

var proxy = demo2.createExample({
 height : '65dp',
 top: '50dp',
 backgroundColor:'orange'
});
win.add(proxy);

Here createExample method will accept following properties height, width, left, top and bottom. Similar to RatingBar extension, we can also convert other native controls into titanium view using setNativeView method.

Output Screen:
Module Output Screen

Source Code:
You can download entire module source code here https://github.com/TiTutorial/demo-android-module-2  

Continue with part 4

Wednesday, October 9, 2013

Android Module Development - Part 2

Last week I started  a series of  articles regarding Android Module Development. Toady I am going to continue with next topic which is Using event listeners and callbacks in Module
  1. Understanding methods, properties, constants and module life cycle
  2. Using event listeners and callbacks in Module
  3. Converting native control into Titanium view
  4. Accessing module and app resources
  5. Using XML layouts in modules
Callbacks

During asynchronous operation, if we want to pass the data to javascript layer we have to use callbacks. It will call the particular method to send the data back to javascript layer. For example like onError, onSuccess. Callback will be invoked only once.

Example

Lets consider AudioRecorder module here I am using success and error callbacks, which will be called either on success or failure of audio recording process. It will be invoked only once.

In Module
// initializing callbacks
private KrollFunction successCallback = null;
private KrollFunction errorCallback = null;

// method to invoke success callback
private void sendSuccessEvent(String filepath) {
    if (successCallback != null) {
        HashMap event = new HashMap();
        event.put("filePath", filepath);
        event.put("fileName", outPutFileName);

        // Fire an event directly to the specified listener (callback)
        successCallback.call(getKrollObject(), event);
    }
}

// method to invoke error callback
private void sendErrorEvent(String message) {
    if (errorCallback != null) {
        HashMap event = new HashMap();
        event.put("message", message);

        // Fire an event directly to the specified listener (callback)
        errorCallback.call(getKrollObject(), event);
    }
}

// method to register callbacks, which all passed from javascript layer
@Kroll.method
public void registerCallbacks(HashMap args) {
    Object callback;

    // Save the callback functions, verifying that they are of the correct
    // type
    if (args.containsKey("success")) {
        callback = args.get("success");
        if (callback instanceof KrollFunction) {
            successCallback = (KrollFunction) callback;
        }
    }

    if (args.containsKey("error")) {
        callback = args.get("error");
        if (callback instanceof KrollFunction) {
            errorCallback = (KrollFunction) callback;
        }
    }
}

@Kroll.method
public void startRecording(HashMap args) {
    if (isRecording) {
        // calling sendErrorEvent to invoke error callback
        sendErrorEvent("Another audio record is inprogress");
    } else {
        recorder = null;
        // this method used to register success and error callbacks
        registerCallbacks(args);
        recorder = new MediaRecorder();

        recorder.setOutputFile(outputFileName);
        recorder.setOnErrorListener(errorListener);
        recorder.setOnInfoListener(infoListener);

        try {
            recorder.prepare();
            recorder.start();
            isRecording = true;
        } catch (IllegalStateException e) {
            System.out.println("@@## Error1 e = " + e);
            e.printStackTrace();
            isRecording = false;
            // calling sendErrorEvent to invoke error callback
            sendErrorEvent(e.toString());
        } catch (IOException e) {
            e.printStackTrace();
            System.out.println("@@## Error3 e = " + e);
            isRecording = false;
            // calling sendErrorEvent to invoke error callback
            sendErrorEvent(e.toString());
        }
    }
}
In Javascript
var audioRecorder = require("titutorial.audiorecorder");

audioRecorder.startRecording({
    outputFormat: audioRecorder.OutputFormat_THREE_GPP,
    audioEncoder: audioRecorder.AudioEncoder_AMR_NB,
    directoryName: "testdir",
    fileName: "testfile",
    maxFileSize: 7000,
    success: function (e) {
        alert("success => " + e.filePath);
    },
    error: function (d) {
        alert("error => " + e.message);
    }
});
For more detail refer AudioRecorder module source code and this blog post

Event listeners

Registered  event listeners will be called whenever the event occur.

Example


Lets consider Ratingbar module here when user change the rating, the new rating value passed  to javascript layer via event listener. It may fired so many times.

In Module
private boolean hasListenerChange = false;
//checks whether "change" event listener added to proxy or not
hasListenerChange = proxy.hasListeners("change");

ratingBar.setOnRatingBarChangeListener(new OnRatingBarChangeListener() {
 @SuppressWarnings("deprecation")
 public void onRatingChanged(RatingBar ratingBar, float rating, boolean fromUser) {
  //if listener added to proxy, it pass the data to javascript layer
  if (hasListenerChange) {
   KrollDict props = new KrollDict();
   props.put("rating", rating);
   //fires the change event
   proxy.fireEvent("change", props);
  }
 }
});
In Javascript
var ratingbarProxy = require('titutorial.ratingbar');

var ratingBar = ratingbarProxy.createRatingBar({
    top : '30dp',
    left:15,
    rating : 2,
    stars : 6,
    stepSize : 1.5,
    isIndicator : false
});
win.add(ratingBar);

ratingBar.addEventListener('change', function(e) {
    ratingValue.text = "Rating Value : "+e.rating.toString();
});

For more detailed example refer Ratingbar module source code

Continue with part 3

Monday, October 7, 2013

ACS Push Notification using GCM

Titanium CloudPush module supports two protocols for send push notifications to Android devices.
  1. GCM (Google Cloud Messaging) 
    From Ti SDK 3.1.2 onwards, GCM is the default method to send push notifications. GCM supports devices that run Android 2.2 and later, and requires that the Google Play Store application be installed. For pre-4.0 devices, the user is required to set up their Google account. 

    If you have an existing application that uses the MQTT protocol, you either need to transition your application to use GCM or set the acs-push-type key in the tiapp.xml file to mqtt. This will be explain in detail at end of this tutorial.

  2. MQTT (MQ Telemetry Transport) 
    It is lightweight messaging protocol, designed for constrained devices and low-bandwidth, high-latency or unreliable networks. It consumes less battery. MQTT does not have any specific device requirements.
Here I am going to explain ACS Push Notification using GCM and migrating existing MQTT protocol application to GCM.

We can achieve GCM Push Notification in 6 easy steps
  1. Setting up Google Cloud Messaging
  2. Push Configuration in ACS Console
  3. CloudPush Module Implementation
  4. Retrieve Device Token
  5. Cloud User Login
  6. Subscribe a Channel
1.  Setting up Google Cloud Messaging

Following information taken from here.

To use GCM, you need to create a Google API project to obtain a Google API key and GCM sender ID. For instructions on creating and obtaining these items, see Android Developer: Getting Started with GCM and follow the directions in "Creating a Google API Project", "Enabling the GCM Service" and "Obtaining an API Key".

When creating a new server key, you are asked for a list of IP addresses to accept requests from. Do not enter any information in the textbox and click Create to accept all IP addresses.

Now you will have Google Cloud Messaging (GCM) API Key and GCM sender ID. We are going to used these two values in Step 2.

For detailed instructions, see the "Push Notification" section of ACS: Android SDK.


Google Cloud Messaging Console

2. Push Configuration in ACS Console

Go to https://my.appcelerator.com/apps, then go to My Apps -> Manage ACS -> DEVELOPMENT -> Settings/Android Push Configuration and enter your Google API key in the Google Cloud Messaging (GCM) API Key textbox and GCM sender ID in the Google Cloud Messaging (GCM) Sender ID textbox. (which we got from Step 1) 

Android Push Configuration
Note: If you are using MQTT, just enter application package alone.

3. CloudPush Module Implementation
  • Add CloudPush module into your application.
  • To use push notifications, in the tiapp.xml file, you need to specify push type (either gcm or mqtt). 
CloudPush module
4. Retrieve Device Token

Call the retrieveDeviceToken method before setting the enabled property to true to enable the device to receive push notifications. You must call retrieveDeviceToken before any other CloudPush API call or else the device will not receive push notifications. So below code must be top of any other CloudPush API call.

var CloudPush = require('ti.cloudpush');
CloudPush.retrieveDeviceToken({
    success: function deviceTokenSuccess(e) {
        Ti.API.info('Device Token: ' + e.deviceToken);
    },
    error: function deviceTokenError(e) {
        alert('Failed to register for push! ' + e.error);
    }
});

5. Cloud User Login

Before subscribe for Push Notification, cloud user should logg in.  So create a test user in Appcelerator Cloud Console My Apps -> Manage ACS ->  DEVELOPMENT ->  Users
and login with credential. Use below code for cloud user login

Cloud.Users.login({
    login: 'push123',
    password: 'push123'
}, function (e) {
    if (e.success) {
        alert("login success");
    } else {
        alert('Error: ' + ((e.error & amp; & amp; e.message) || JSON.stringify(e)));
    }
});    

6. Subscribe a Channel

Add following code for channel subscription
 
Cloud.PushNotifications.subscribe({
    channel: 'alert', //'alert' is channel name
    device_token: deviceToken,
    type: 'gcm' //here i am using gcm, it is recommended one
}, function (e) {
    if (e.success) {
        alert('Subscribed for Push Notification!');
    } else {
        alert('Subscribe error:' + ((e.error & amp; & amp; e.message) || JSON.stringify(e)));
    }
});

Using MQTT with ACS

Using MQTT with ACS similar to above one, but few steps has slighter difference. Please follow below things
  1. Step 1(Setting up Google Cloud Messaging) not necessary 
  2. In Step 2, just enter application package in text box. No need to enter GCM API Key and GCM sender ID
  3. In Step 3, use acs push type as mqtt instead of gcm
  4. In Step 6, use type as 'android' instead of 'gcm'
Cool.., You have completed Android Push Notification setup(Here is the whole sample app). This is time for testing, run the application in android device and click the button "Android Cloud Push Notification". You will get 3 alerts continuously.

Then go to My Apps -> Manage ACS -> DEVELOPMENT -> Push Notifications, here you can see "1 Android clients subscribed to push notifications"


Push Notifications Subscription
How to customize ACS Push notification?
Here you can use use your custom sounds and icons.

Icon
custom icons must be placed in below directory
app_root/platform/android/res/drawable/myicon.png 

Here "myicon.png" is custom icon, specified in the push message without the filename extension. For example: in icon text box enter the file name without extension(myicon)

Sound
Custom sound must be placed in below directory
app_root/platform/android/assets/sound/beep.wav 

Here "beep.wav" is custom sound, specified in the push message with the filename extension. For example: in custom sound text box you have to enter sound filename with extension(beep.wav). Here is the screens of custom notification

ACS Push Notification Screenshot
Source code:
 
Here you can download the complete working project from my Github ACS Android Push Notification with GCM

Note: 
  1. AppC strongly recommend you to use and migrate to GCM.
  2. java.lang.ExceptionInInitializerError at com.appcelerator.cloud.push.CCPushService.registerGCMServiceBackground(CCPushService.java:482) - If you encountered this error in Android 2.3, you have to use ti.cloudpush 2.3.3. You can download here.

Wednesday, October 2, 2013

Android Module Development - Part 1

I plan to write series of blog posts about Android module development in Titanium. I wish to cover below topics in each week with clear example
  1. Understanding methods, properties, constants and module life cycle
  2. Using event listeners and callbacks in Module
  3. Converting native control into Titanium view
  4. Accessing module and app resources
  5. Using XML layouts in modules
This week I am going to explain about methods, properties, constants and module life cycle in Android module development. Before getting into this make sure we fulfil the following requirements

Environment Setup
  • Titanium SDK.
  • All of the prerequisites for developing Android applications.
  • Android NDK. Add an ANDROID_NDK environment variable pointing to the NDK folder.
  • Ant 1.7.1 or above must be installed and assigned in your system PATH, to build from the command line.
  • Eclipse and ADT can be used instead of or in addition to Ant.
  • gperf must be installed and assigned in your system PATH.
Refer Android Module Development Guide for environment setup.

Creating a sample Android Module

You can create a module using either CLI or Titanium Studio, Creating New Titanium Module  document explains more about this.

Okay, cool. Now you have setup the module development environment and created a module. Now you can see following files inside yours module’s res folder(module_root/res). Let assume that your module name is demo
  1. DemoModule.java
  2. ExampleProxy.java - (this is used to return view from module)
Module Life-cycle Events

If you want to do anything during application startup, you can use onAppCreate method. This is optional method. It has @Kroll.onAppCreate annotation before its declaration
@Kroll.onAppCreate
public static void onAppCreate(TiApplication app)
{
    Log.d(LCAT, "[MODULE LIFECYCLE EVENT] onAppCreate notification");
} 

Methods


Inside module you can declare method by preceding with @Kroll.method  annotation.

In Module
//this method print the log message
@Kroll.method
public void printLog() {
   Log.d (TAG,"Hello world..." );
}

//this method concat two strings and return the result string
@Kroll.method
public String addStrings(String a, String b)
{
   return a.concat(b);
}
In Javascript
//in javascript you can access the method by
var demo = require("titutorial.demo");
demo.printLog();
demo.addStrings("Hello", "World");
Properties

We can set the properties for the module in two ways,
  1. Using custom getter and setter methods for each property
  2. Using propertyAccessors annotation
1. Using Custom Accessor Methods

Getter and setter methods are declared with @Kroll.getProperty and @Kroll.setProperty annotations. Here we need to specify the getter and setter methods for each property.
In module
@Kroll.getProperty @Kroll.method
public String getTag() {
 return tag;
}

@Kroll.setProperty @Kroll.method
public void setTag(String t) {
 tag = t;
}
In javascript
var demo = require("titutorial.demo");
//getting property value
alert(demo.tag);// or
alert(demo.getTag());

//setting property value
demo.tag = "testing"; // or
demo.setTag("testing");

2. Using propertyAccessors Annotation

You can also define a set of properties in your @Kroll.proxy or @Kroll.method annotation using the propertyAccessors element, and the accessors will be automatically generated for you:
// hintText and value prop declared using propertyAccessors 
@Kroll.module(name="Demo", id="titutorial.demo", propertyAccessors = { "hintText", "value" })
Constants:

Constants are declared with @Kroll.constant annotation. Here's an example:
In module
@Kroll.module
public class DemoModule extends KrollModule {
    @Kroll.constant
    public static final int PAGE_LIMIT = 10;
}
In javascript
//constant can now be referred to directly from JavaScript
var demo = require("titutorial.demo");
alert(demo.PAGE_LIMIT);
Here you can find demo module source code https://github.com/TiTutorial/demo-android-module

Continue with part 2

Wednesday, September 11, 2013

Audio Recorder Module

Audio Recorder module helps to record audio without using intent in Android. Using this module we can record audio in different format like(mp4,3gp) without help of intent. This module uses MediaRecorder class to record audio.

Titanium Audio Recorder Module

Features and Benefits
  • File format
    Module support for both mp4 and 3gp formats.
  • Audio Encoders
    Module support for following audio encoder types AAC, AMR_NB, AMR_WB, DEFAULT
  • External Storage
    It saves output file in external storage inside the specified directory
  • maxDuration
    Option to stop the recording session after the specified duration
  • maxFileSize
    Option to stop the recording session after the specified file size

Usage:
var audioRecorder = require("titutorial.audiorecorder");

audioRecorder.startRecording({
    outputFormat : audioRecorder.OutputFormat_THREE_GPP,
    audioEncoder : audioRecorder.AudioEncoder_AMR_NB,
    directoryName : "testdir",
    fileName : "testfile",
    maxFileSize : 7000,
    success : function(e) {
        alert("success => " + e.filePath);
        Ti.API.info("response is => " + JSON.stringify(e));
        var audioDir = Titanium.Filesystem.getFile(Titanium.Filesystem.externalStorageDirectory, "testdir");
        var audioFile = Ti.Filesystem.getFile(audioDir.resolve(), e.fileName);
        Ti.API.info("audioFile.nativePath = " + audioFile.nativePath);
    },
    error : function(d) {
        alert("error => " + e.message);
        Ti.API.info("error is => " + JSON.stringify(d));
    }
});

Download:
Module: https://marketplace.appcelerator.com/apps/6516?1532012201
Source Code: https://github.com/railskarthi/AudioRecorder

iPhone NavigationGroup in Alloy

In this post I am going to share how to use iPhone NavigationGroup in Alloy project.

In Titanium this method used to create the NavigationGroup. Following example also covers below things
  • Creating NavigationGroup
  • Opening a new window in NavigationGroup
  • Closing NavigationGroup
 
iPhone NavigationGroup Example

 Example App: https://github.com/TiTutorial/alloy_navigation_group

Thursday, August 29, 2013

RatingBar Module - Android

RatingBar is an extension that shows a rating in stars. The user can touch/drag to set the rating when using RatingBar.

This module converts native Android RatingBar widget to Titanium component.

Features:
  • Touch/Drag Rating
    User can touch/drag to set the rating when using RatingBar.
  • Number of stars
    User can customize no of stars (or rating items) in RatingBar using using setStars method.
  • stepSize
    User can sets the step size (granularity) of this RatingBar
  • setIsIndicator
    User can sets whether this rating bar is an indicator (and non-changeable by the user).
Using Custom Resources:
If you want to use custom resource in your App you can override default resource. For that you have to place your custom resource inside app_root/platform/android/res or app_root/modules/android/titutorial.ratingbar/0.1/platform/android/res in the same name.

For example, if you want to override star_on image you have to override your custom image with the same name star_on.png

Usage:
var win = Ti.UI.createWindow({
 backgroundColor:'#fff',
 layout : 'vertical'
});

var ratingbar = require('titutorial.ratingbar');

var setRatingButton = Ti.UI.createButton({
 title : 'Set rating 6',
 height : '40dp',
 width : Ti.UI.SIZE,
 top : '30dp'
});
win.add(setRatingButton);

/*
 * Dynamic rating bar
 */
var ratingBar1 = ratingbar.createRatingBar({
 top : '30dp',
 left:15,
 rating : 2,
 stars : 6,
 stepSize : 1.5,
 isIndicator : false
});
win.add(ratingBar1);

var ratingValue = Ti.UI.createLabel({
 text : 'Rating Value : '+ratingBar1.getRating(),
 color : '#000',
 font : {fontSize:'20dp'},
 height : Ti.UI.SIZE,
 width : Ti.UI.SIZE,
 top : '30dp',
 textAlign : 'center'
});
win.add(ratingValue);

ratingBar1.addEventListener('change', function(e) {
 ratingValue.text = "Rating Value : "+e.rating.toString();
});

/*
 * Static rating bar
 */
var ratingBar2 = ratingbar.createRatingBar({
 top : '30dp',
 left:15,
 rating : 3,
 stars : 5,
 stepSize : 1,
 isIndicator : true
});
win.add(ratingBar2);

setRatingButton.addEventListener('click', function() {
 ratingBar1.setRating(6.0);
});

win.open(); 

Download:
Module: https://marketplace.appcelerator.com/apps/6371?1827333944
Source Code: https://github.com/railskarthi/ratingbar

Screenshot:
Titanium RatingBar Module
 

Wednesday, August 7, 2013

Android YouTube Player

Android module that plays videos from YouTube.

This module create an Android activity that allows developers to play videos that are hosted on YouTube. This module is based on Android YouTube player library.

The original code was created by KeyesLabs (www.keyeslabs.com) as part of the Screebl project. The developers wanted the ability to play YouTube-hosted help videos, and wanted those videos to be able to play on any device, even those that didn't have the stock YouTube player app.

Android YouTube Player
NOTE: If module unable to get the RTSP url from YouTube server, then video cannot be played.

Features:
  • Higher Bandwidth Video
    This module plays higher bandwidth video from YouTube server as new Activity.
  • Auto Play
    Without user interaction, video will will play automatically in landscape mode once it is loaded from YouTube server.
  • Video Player Controls
    YouTube video player comes with default controls like play, pause, SeekForward, SeekBackward.
  • Play by Video Id and Playlist Id
    playVideo method takes video id as input parameter and plays video automatcally.
    playPlayListVideo
    method takes playlist id as input parameter then it will play the latest video added to a YouTube playlist.
Usage:
var win = Ti.UI.createWindow({
 backgroundColor : "#fff",
 layout : "vertical"
});

var youtubePlayer = require('titutorial.youtubeplayer');
Ti.API.info("module is => " + youtubePlayer);

/*
 * Play video by videoId
 */
var playVideo = Ti.UI.createButton({
 title : 'Play video',
 height : '40dp',
 width : Ti.UI.SIZE,
 top : '100dp'
});
win.add(playVideo);

playVideo.addEventListener('click', function() {
 youtubePlayer.playVideo("FjMs_imWkFM");
});

/*
 * Play video by playListId
 */
var playPlayListVideo = Ti.UI.createButton({
 title : 'Play playlist video',
 height : '40dp',
 width : Ti.UI.SIZE,
 top : '100dp'
});

playPlayListVideo.addEventListener('click', function() {
 youtubePlayer.playPlayListVideo("PLB03EA9545DD188C3");
});

win.add(playPlayListVideo);

win.open();
Download:
Module: https://marketplace.appcelerator.com/apps/6223?942520925
Source code: https://github.com/railskarthi/YoutubePlayer-Android

Screenshot:
Android YouTube Player
 

Sunday, June 9, 2013

Android System Info Module

Recently I developed an native module called Android System Info Module and published in Appcelerator Marketplace.

Android System Info Module in AppC Marketplace

This module used to get the basic Android system information.

Using this module we can get system information like
  •  OS VERSION
  •  API LEVEL
  •  HARDWARE MANUFACTURER
  •  DEVICE
  •  MODEL
  •  SYSTEM RAM(both in kb and mb)
  •  ABI
  •  PROCESSOR 

Accessing the Android System Info Module

To access this module from JavaScript, you would do the following:
var systeminfo = require("titutorial.sysinfo");  

Usage
var systeminfo = require('titutorial.sysinfo');
var infoStr = systeminfo.getInfo(); //response would be string 
var infoObj = JSON.parse(infoStr);  //parsing string to JSON object
Ti.API.info("infoObj obj => " + infoObj);

Sample Response
var sampleResponse = {
     PROCESSOR: "ARMV7 Processor rev 1 (v71)",
     MODEL: "ST25i",
     RAM(mb): "368 mb",
     RAM(kb): "376920 kb",
     OS_VERSION: "2.3.7",
     API_LEVEL : "10",
     ABI : "armeabi-v7a",
     MANUFACTURER : "Sony Ericsson"
};
Android System info Module Example app
Module URL : https://marketplace.appcelerator.com/apps/5770?1412283645