Ads

Showing posts with label Android. Show all posts

Tuesday, August 2, 2016

Sending Audio Message in Layer Chat SDK

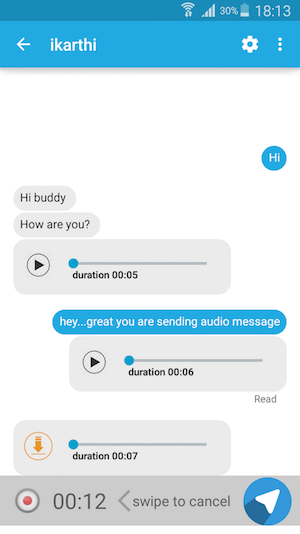
I have forked the https://github.com/layerhq/Atlas-Android-Messenger and added  support for send and receive audio message from the mobile app.

Sending Audio Message:

AtlasMessageComposer.java handles below things,
* Recording audio message in .mp4
* Saving in SD card
* Displaying reording timer
* Send message via Layer client

Receiving Audio Message:

AudioCellFactory.java (which is new CellFactory to haldle audio message) handles below things,
* Rendering MediaPlayer with Seekbar in MessageListActivity if mime type meets audio type
* Downloading audio in SD card
* Playing audio via MediaPlayer
* Handles Paly/Pause

Notes:

* Reason for using .mp4 format is, FireFox not supporting .3gp files
* This modified app will create below folder structure in SD card root,
  sd_card_root/Chat/Audio/Sent

Disclaimer:

I haven't added Runtime Permission for API level 23. So this app will crash if you run on API level >= 23. So feel free to add runtime Permission and give me a PR.

Screens:
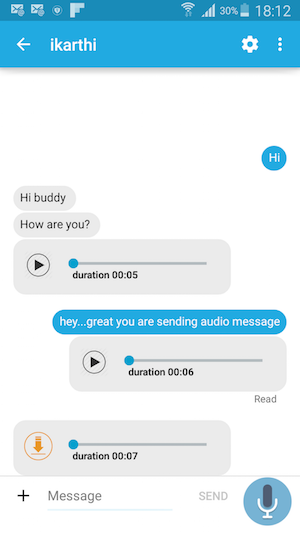
Screen1 Screen2

Thursday, November 28, 2013

Android Multi Image Picker Module

Multi Image Picker module helps to select multiple images from Gallery.

This module developed from existing Android open source library MultipleImagePick. And it uses Universal image loader library for asynchronous loading and caching.

Multiple Image Picker Screen

Features and Benefits:
  • Select multiple images - Option to select multiple images from Gallery and fast scroll over the Gallery
  • Maximum selection limit - Option to set maximum image selection limit
  • Custom button title and error message - There is a option to customize button title and error message
  • Method for scale down the bitmap - To avoid out of memory issue, this module has in build bitmap scale down method
  • Callback methods - Success, error and cancel callback methods

Usage: 
var gallerypicker = require('titutorial.gallerypicker');
gallerypicker.openGallery({
    cancelButtonTitle: "Cancel",
    doneButtonTitle: "Okay",
    title: "Custom Gallery",
    errorMessage: "Limit reached",
    limit: 10,
    success: function (e) {
        Ti.API.info("response is => " + JSON.stringify(e));
        var imgArray = e.filePath.split(",");

        for (var i = 0; i < imgArray.length; i++) {
            if (imgArray[i]) {
                var imgView = Ti.UI.createImageView({
                    left: '10dp',
                    top: '10dp',
                    image: gallerypicker.decodeBitmapResource(imgArray[i], 100, 100)
                });
                imageHolder.add(imgView);
            }
        }
    },
    error: function (e) {
        alert("error " + JSON.stringify(e));
    }
});

Download:
Source code : https://github.com/railskarthi/TiMultiImagePicker
Module : https://marketplace.appcelerator.com/apps/7215?1782767416

Monday, October 7, 2013

ACS Push Notification using GCM

Titanium CloudPush module supports two protocols for send push notifications to Android devices.
  1. GCM (Google Cloud Messaging) 
    From Ti SDK 3.1.2 onwards, GCM is the default method to send push notifications. GCM supports devices that run Android 2.2 and later, and requires that the Google Play Store application be installed. For pre-4.0 devices, the user is required to set up their Google account. 

    If you have an existing application that uses the MQTT protocol, you either need to transition your application to use GCM or set the acs-push-type key in the tiapp.xml file to mqtt. This will be explain in detail at end of this tutorial.

  2. MQTT (MQ Telemetry Transport) 
    It is lightweight messaging protocol, designed for constrained devices and low-bandwidth, high-latency or unreliable networks. It consumes less battery. MQTT does not have any specific device requirements.
Here I am going to explain ACS Push Notification using GCM and migrating existing MQTT protocol application to GCM.

We can achieve GCM Push Notification in 6 easy steps
  1. Setting up Google Cloud Messaging
  2. Push Configuration in ACS Console
  3. CloudPush Module Implementation
  4. Retrieve Device Token
  5. Cloud User Login
  6. Subscribe a Channel
1.  Setting up Google Cloud Messaging

Following information taken from here.

To use GCM, you need to create a Google API project to obtain a Google API key and GCM sender ID. For instructions on creating and obtaining these items, see Android Developer: Getting Started with GCM and follow the directions in "Creating a Google API Project", "Enabling the GCM Service" and "Obtaining an API Key".

When creating a new server key, you are asked for a list of IP addresses to accept requests from. Do not enter any information in the textbox and click Create to accept all IP addresses.

Now you will have Google Cloud Messaging (GCM) API Key and GCM sender ID. We are going to used these two values in Step 2.

For detailed instructions, see the "Push Notification" section of ACS: Android SDK.


Google Cloud Messaging Console

2. Push Configuration in ACS Console

Go to https://my.appcelerator.com/apps, then go to My Apps -> Manage ACS -> DEVELOPMENT -> Settings/Android Push Configuration and enter your Google API key in the Google Cloud Messaging (GCM) API Key textbox and GCM sender ID in the Google Cloud Messaging (GCM) Sender ID textbox. (which we got from Step 1) 

Android Push Configuration
Note: If you are using MQTT, just enter application package alone.

3. CloudPush Module Implementation
  • Add CloudPush module into your application.
  • To use push notifications, in the tiapp.xml file, you need to specify push type (either gcm or mqtt). 
CloudPush module
4. Retrieve Device Token

Call the retrieveDeviceToken method before setting the enabled property to true to enable the device to receive push notifications. You must call retrieveDeviceToken before any other CloudPush API call or else the device will not receive push notifications. So below code must be top of any other CloudPush API call.

var CloudPush = require('ti.cloudpush');
CloudPush.retrieveDeviceToken({
    success: function deviceTokenSuccess(e) {
        Ti.API.info('Device Token: ' + e.deviceToken);
    },
    error: function deviceTokenError(e) {
        alert('Failed to register for push! ' + e.error);
    }
});

5. Cloud User Login

Before subscribe for Push Notification, cloud user should logg in.  So create a test user in Appcelerator Cloud Console My Apps -> Manage ACS ->  DEVELOPMENT ->  Users
and login with credential. Use below code for cloud user login

Cloud.Users.login({
    login: 'push123',
    password: 'push123'
}, function (e) {
    if (e.success) {
        alert("login success");
    } else {
        alert('Error: ' + ((e.error & amp; & amp; e.message) || JSON.stringify(e)));
    }
});    

6. Subscribe a Channel

Add following code for channel subscription
 
Cloud.PushNotifications.subscribe({
    channel: 'alert', //'alert' is channel name
    device_token: deviceToken,
    type: 'gcm' //here i am using gcm, it is recommended one
}, function (e) {
    if (e.success) {
        alert('Subscribed for Push Notification!');
    } else {
        alert('Subscribe error:' + ((e.error & amp; & amp; e.message) || JSON.stringify(e)));
    }
});

Using MQTT with ACS

Using MQTT with ACS similar to above one, but few steps has slighter difference. Please follow below things
  1. Step 1(Setting up Google Cloud Messaging) not necessary 
  2. In Step 2, just enter application package in text box. No need to enter GCM API Key and GCM sender ID
  3. In Step 3, use acs push type as mqtt instead of gcm
  4. In Step 6, use type as 'android' instead of 'gcm'
Cool.., You have completed Android Push Notification setup(Here is the whole sample app). This is time for testing, run the application in android device and click the button "Android Cloud Push Notification". You will get 3 alerts continuously.

Then go to My Apps -> Manage ACS -> DEVELOPMENT -> Push Notifications, here you can see "1 Android clients subscribed to push notifications"


Push Notifications Subscription
How to customize ACS Push notification?
Here you can use use your custom sounds and icons.

Icon
custom icons must be placed in below directory
app_root/platform/android/res/drawable/myicon.png 

Here "myicon.png" is custom icon, specified in the push message without the filename extension. For example: in icon text box enter the file name without extension(myicon)

Sound
Custom sound must be placed in below directory
app_root/platform/android/assets/sound/beep.wav 

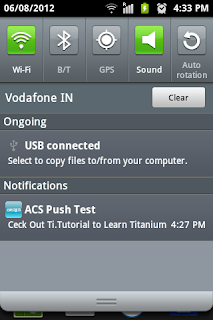
Here "beep.wav" is custom sound, specified in the push message with the filename extension. For example: in custom sound text box you have to enter sound filename with extension(beep.wav). Here is the screens of custom notification

ACS Push Notification Screenshot
Source code:
 
Here you can download the complete working project from my Github ACS Android Push Notification with GCM

Note: 
  1. AppC strongly recommend you to use and migrate to GCM.
  2. java.lang.ExceptionInInitializerError at com.appcelerator.cloud.push.CCPushService.registerGCMServiceBackground(CCPushService.java:482) - If you encountered this error in Android 2.3, you have to use ti.cloudpush 2.3.3. You can download here.

Wednesday, October 2, 2013

Android Module Development - Part 1

I plan to write series of blog posts about Android module development in Titanium. I wish to cover below topics in each week with clear example
  1. Understanding methods, properties, constants and module life cycle
  2. Using event listeners and callbacks in Module
  3. Converting native control into Titanium view
  4. Accessing module and app resources
  5. Using XML layouts in modules
This week I am going to explain about methods, properties, constants and module life cycle in Android module development. Before getting into this make sure we fulfil the following requirements

Environment Setup
  • Titanium SDK.
  • All of the prerequisites for developing Android applications.
  • Android NDK. Add an ANDROID_NDK environment variable pointing to the NDK folder.
  • Ant 1.7.1 or above must be installed and assigned in your system PATH, to build from the command line.
  • Eclipse and ADT can be used instead of or in addition to Ant.
  • gperf must be installed and assigned in your system PATH.
Refer Android Module Development Guide for environment setup.

Creating a sample Android Module

You can create a module using either CLI or Titanium Studio, Creating New Titanium Module  document explains more about this.

Okay, cool. Now you have setup the module development environment and created a module. Now you can see following files inside yours module’s res folder(module_root/res). Let assume that your module name is demo
  1. DemoModule.java
  2. ExampleProxy.java - (this is used to return view from module)
Module Life-cycle Events

If you want to do anything during application startup, you can use onAppCreate method. This is optional method. It has @Kroll.onAppCreate annotation before its declaration
@Kroll.onAppCreate
public static void onAppCreate(TiApplication app)
{
    Log.d(LCAT, "[MODULE LIFECYCLE EVENT] onAppCreate notification");
} 

Methods


Inside module you can declare method by preceding with @Kroll.method  annotation.

In Module
//this method print the log message
@Kroll.method
public void printLog() {
   Log.d (TAG,"Hello world..." );
}

//this method concat two strings and return the result string
@Kroll.method
public String addStrings(String a, String b)
{
   return a.concat(b);
}
In Javascript
//in javascript you can access the method by
var demo = require("titutorial.demo");
demo.printLog();
demo.addStrings("Hello", "World");
Properties

We can set the properties for the module in two ways,
  1. Using custom getter and setter methods for each property
  2. Using propertyAccessors annotation
1. Using Custom Accessor Methods

Getter and setter methods are declared with @Kroll.getProperty and @Kroll.setProperty annotations. Here we need to specify the getter and setter methods for each property.
In module
@Kroll.getProperty @Kroll.method
public String getTag() {
 return tag;
}

@Kroll.setProperty @Kroll.method
public void setTag(String t) {
 tag = t;
}
In javascript
var demo = require("titutorial.demo");
//getting property value
alert(demo.tag);// or
alert(demo.getTag());

//setting property value
demo.tag = "testing"; // or
demo.setTag("testing");

2. Using propertyAccessors Annotation

You can also define a set of properties in your @Kroll.proxy or @Kroll.method annotation using the propertyAccessors element, and the accessors will be automatically generated for you:
// hintText and value prop declared using propertyAccessors 
@Kroll.module(name="Demo", id="titutorial.demo", propertyAccessors = { "hintText", "value" })
Constants:

Constants are declared with @Kroll.constant annotation. Here's an example:
In module
@Kroll.module
public class DemoModule extends KrollModule {
    @Kroll.constant
    public static final int PAGE_LIMIT = 10;
}
In javascript
//constant can now be referred to directly from JavaScript
var demo = require("titutorial.demo");
alert(demo.PAGE_LIMIT);
Here you can find demo module source code https://github.com/TiTutorial/demo-android-module

Continue with part 2

Wednesday, September 11, 2013

Audio Recorder Module

Audio Recorder module helps to record audio without using intent in Android. Using this module we can record audio in different format like(mp4,3gp) without help of intent. This module uses MediaRecorder class to record audio.

Titanium Audio Recorder Module

Features and Benefits
  • File format
    Module support for both mp4 and 3gp formats.
  • Audio Encoders
    Module support for following audio encoder types AAC, AMR_NB, AMR_WB, DEFAULT
  • External Storage
    It saves output file in external storage inside the specified directory
  • maxDuration
    Option to stop the recording session after the specified duration
  • maxFileSize
    Option to stop the recording session after the specified file size

Usage:
var audioRecorder = require("titutorial.audiorecorder");

audioRecorder.startRecording({
    outputFormat : audioRecorder.OutputFormat_THREE_GPP,
    audioEncoder : audioRecorder.AudioEncoder_AMR_NB,
    directoryName : "testdir",
    fileName : "testfile",
    maxFileSize : 7000,
    success : function(e) {
        alert("success => " + e.filePath);
        Ti.API.info("response is => " + JSON.stringify(e));
        var audioDir = Titanium.Filesystem.getFile(Titanium.Filesystem.externalStorageDirectory, "testdir");
        var audioFile = Ti.Filesystem.getFile(audioDir.resolve(), e.fileName);
        Ti.API.info("audioFile.nativePath = " + audioFile.nativePath);
    },
    error : function(d) {
        alert("error => " + e.message);
        Ti.API.info("error is => " + JSON.stringify(d));
    }
});

Download:
Module: https://marketplace.appcelerator.com/apps/6516?1532012201
Source Code: https://github.com/railskarthi/AudioRecorder

Thursday, August 29, 2013

RatingBar Module - Android

RatingBar is an extension that shows a rating in stars. The user can touch/drag to set the rating when using RatingBar.

This module converts native Android RatingBar widget to Titanium component.

Features:
  • Touch/Drag Rating
    User can touch/drag to set the rating when using RatingBar.
  • Number of stars
    User can customize no of stars (or rating items) in RatingBar using using setStars method.
  • stepSize
    User can sets the step size (granularity) of this RatingBar
  • setIsIndicator
    User can sets whether this rating bar is an indicator (and non-changeable by the user).
Using Custom Resources:
If you want to use custom resource in your App you can override default resource. For that you have to place your custom resource inside app_root/platform/android/res or app_root/modules/android/titutorial.ratingbar/0.1/platform/android/res in the same name.

For example, if you want to override star_on image you have to override your custom image with the same name star_on.png

Usage:
var win = Ti.UI.createWindow({
 backgroundColor:'#fff',
 layout : 'vertical'
});

var ratingbar = require('titutorial.ratingbar');

var setRatingButton = Ti.UI.createButton({
 title : 'Set rating 6',
 height : '40dp',
 width : Ti.UI.SIZE,
 top : '30dp'
});
win.add(setRatingButton);

/*
 * Dynamic rating bar
 */
var ratingBar1 = ratingbar.createRatingBar({
 top : '30dp',
 left:15,
 rating : 2,
 stars : 6,
 stepSize : 1.5,
 isIndicator : false
});
win.add(ratingBar1);

var ratingValue = Ti.UI.createLabel({
 text : 'Rating Value : '+ratingBar1.getRating(),
 color : '#000',
 font : {fontSize:'20dp'},
 height : Ti.UI.SIZE,
 width : Ti.UI.SIZE,
 top : '30dp',
 textAlign : 'center'
});
win.add(ratingValue);

ratingBar1.addEventListener('change', function(e) {
 ratingValue.text = "Rating Value : "+e.rating.toString();
});

/*
 * Static rating bar
 */
var ratingBar2 = ratingbar.createRatingBar({
 top : '30dp',
 left:15,
 rating : 3,
 stars : 5,
 stepSize : 1,
 isIndicator : true
});
win.add(ratingBar2);

setRatingButton.addEventListener('click', function() {
 ratingBar1.setRating(6.0);
});

win.open(); 

Download:
Module: https://marketplace.appcelerator.com/apps/6371?1827333944
Source Code: https://github.com/railskarthi/ratingbar

Screenshot:
Titanium RatingBar Module
 

Wednesday, August 7, 2013

Android YouTube Player

Android module that plays videos from YouTube.

This module create an Android activity that allows developers to play videos that are hosted on YouTube. This module is based on Android YouTube player library.

The original code was created by KeyesLabs (www.keyeslabs.com) as part of the Screebl project. The developers wanted the ability to play YouTube-hosted help videos, and wanted those videos to be able to play on any device, even those that didn't have the stock YouTube player app.

Android YouTube Player
NOTE: If module unable to get the RTSP url from YouTube server, then video cannot be played.

Features:
  • Higher Bandwidth Video
    This module plays higher bandwidth video from YouTube server as new Activity.
  • Auto Play
    Without user interaction, video will will play automatically in landscape mode once it is loaded from YouTube server.
  • Video Player Controls
    YouTube video player comes with default controls like play, pause, SeekForward, SeekBackward.
  • Play by Video Id and Playlist Id
    playVideo method takes video id as input parameter and plays video automatcally.
    playPlayListVideo
    method takes playlist id as input parameter then it will play the latest video added to a YouTube playlist.
Usage:
var win = Ti.UI.createWindow({
 backgroundColor : "#fff",
 layout : "vertical"
});

var youtubePlayer = require('titutorial.youtubeplayer');
Ti.API.info("module is => " + youtubePlayer);

/*
 * Play video by videoId
 */
var playVideo = Ti.UI.createButton({
 title : 'Play video',
 height : '40dp',
 width : Ti.UI.SIZE,
 top : '100dp'
});
win.add(playVideo);

playVideo.addEventListener('click', function() {
 youtubePlayer.playVideo("FjMs_imWkFM");
});

/*
 * Play video by playListId
 */
var playPlayListVideo = Ti.UI.createButton({
 title : 'Play playlist video',
 height : '40dp',
 width : Ti.UI.SIZE,
 top : '100dp'
});

playPlayListVideo.addEventListener('click', function() {
 youtubePlayer.playPlayListVideo("PLB03EA9545DD188C3");
});

win.add(playPlayListVideo);

win.open();
Download:
Module: https://marketplace.appcelerator.com/apps/6223?942520925
Source code: https://github.com/railskarthi/YoutubePlayer-Android

Screenshot:
Android YouTube Player
 

Sunday, June 9, 2013

Android System Info Module

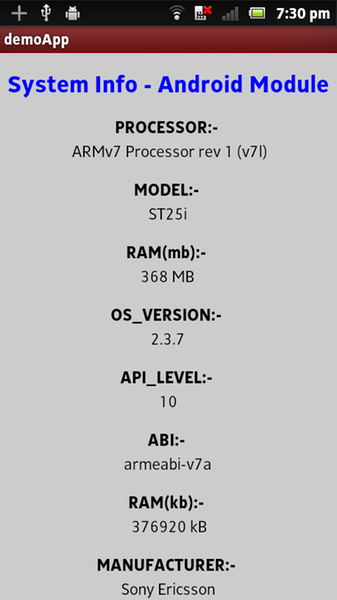
Recently I developed an native module called Android System Info Module and published in Appcelerator Marketplace.

Android System Info Module in AppC Marketplace

This module used to get the basic Android system information.

Using this module we can get system information like
  •  OS VERSION
  •  API LEVEL
  •  HARDWARE MANUFACTURER
  •  DEVICE
  •  MODEL
  •  SYSTEM RAM(both in kb and mb)
  •  ABI
  •  PROCESSOR 

Accessing the Android System Info Module

To access this module from JavaScript, you would do the following:
var systeminfo = require("titutorial.sysinfo");  

Usage
var systeminfo = require('titutorial.sysinfo');
var infoStr = systeminfo.getInfo(); //response would be string 
var infoObj = JSON.parse(infoStr);  //parsing string to JSON object
Ti.API.info("infoObj obj => " + infoObj);

Sample Response
var sampleResponse = {
     PROCESSOR: "ARMV7 Processor rev 1 (v71)",
     MODEL: "ST25i",
     RAM(mb): "368 mb",
     RAM(kb): "376920 kb",
     OS_VERSION: "2.3.7",
     API_LEVEL : "10",
     ABI : "armeabi-v7a",
     MANUFACTURER : "Sony Ericsson"
};
Android System info Module Example app
Module URL : https://marketplace.appcelerator.com/apps/5770?1412283645

Monday, September 17, 2012

Locking Android Orientation Mode

You can lock the orientation mode for Android in Titanium by successfully implementing the following steps :

By following the below steps you can lock the orientation mode throughout the app.

 1) Create a custom AndroidManifest.xml (copy this from original generated source
"build/android/AndroidManifest.xml")
2) Copy this on the created folder "platform/android/AndroidManifest.xml" at the top level of your project.(Inside your project root)
Locking Android Orientation Mode

3) Add this: android:screenOrientation="portrait" to all activities
4) Remove this: "|orientation" from all activities.

Here is my AndroidManifest.xml.


Here you can download the complete working project from my Github account Titanium-Android-Orientation

Wednesday, September 12, 2012

Appcelerator Titanium Alloy Framework

My Presentation About Appcelerator Alloy Frame work


Here you can download the complete working project from my Github account  Appcelerator Titanium Alloy Sample App

Tuesday, August 14, 2012

Top 5 Visited Posts

Here are the Top 5 visited post on titaniumtutorial.com based on Google Analytics stats.

Post
Appcelerator Cloud Push Notification in Android
Push Notification for Android using Appcelerator Cloud Service(ACS)
Launch third-party apps from Titanium App
Launch iOS Native(Map,Settings,Browser,..etc)/Third-party applications from our Titanium Application
Appcelerator Cloud Push Notification in iPhone
Push Notification for iOS using Appcelerator Cloud Service(ACS)
Appcelerator Cloud Service Custom Object and Query
Custom Objects using >Appcelerator Cloud Service and Query(Order by, Greater than, Less Than, Equal) the Objects
WebView in Appcelerator Titanium
WebView in Appcelerator Titanium with events explanation

Monday, July 2, 2012

Titanium Layout

In Titanium, windows and views have layout property. There are three types of Layout available in Titanium
  1. Composite or Absolute (default)
  2. Vertical
  3. Horizontal
Composite or Absolute (default)
It is default layout. A child view is positioned based on its positioning properties(top, bottom, left, right and center). If no positioning properties are specified, the child is centered.
var win = Ti.UI.currentWindow;

var label1 = Ti.UI.createLabel({
    text : 'Sample Text 1',
    color : 'blue',
    height : 40,
    width : 180,
    top : 100,
    left : 60,
    font:{fontSize:14, fontWeight:'bold'},
    textAlign : 'center'
});
win.add(label1);

var label2 = Ti.UI.createLabel({
    text : 'Sample Text 2',
    color : 'blue',
    height : 40,
    width : 180,
    top : 160,
    left : 60,
    font:{fontSize:14, fontWeight:'bold'},
    textAlign : 'center'
});
win.add(label2);

var label3 = Ti.UI.createLabel({
    text : 'Sample Text 3',
    color : 'blue',
    height : 40,
    width : 180,
    top : 220,
    left : 60,
    font:{fontSize:14, fontWeight:'bold'},
    textAlign : 'center'
});
win.add(label3);

Vertical
In vertical layout all children are ordered one below the other(top to bottom). All child sandboxes have the same width (set to the parent's width).

The first child is laid out top units from its parent's bounding box. Each subsequent child is laid out below the previous child. The space between children is equal to the upper child's bottom value plus the lower child's top value.
var win = Ti.UI.currentWindow;
    win.layout = "vertical";

var label1 = Ti.UI.createLabel({
    text : 'Sample Text 1',
    font:{fontSize:14, fontWeight:'bold'},
    color : 'blue',
    top : 50
});
win.add(label1);


var label2 = Ti.UI.createLabel({
    text : 'Sample Text 2',
    font:{fontSize:14, fontWeight:'bold'},
    color : 'blue',
    top : 50
});
win.add(label2);


var label3 = Ti.UI.createLabel({
    text : 'Sample Text 3',
    font:{fontSize:14, fontWeight:'bold'},
    color : 'blue',
    top : 50
});
win.add(label3);

Horizontal
In horizontal layout all children are ordered next to each other in a row.
All children in a row have the same sandbox height.

Here children are laid out horizontally from left to right, in rows. If a child requires more horizontal space than exists in the current row, it is wrapped to a new row. The height of each row is equal to the maximum height of the children in that row.
var win = Ti.UI.currentWindow;
    win.layout = "horizontal";

var label1 = Ti.UI.createLabel({
    text : 'Sample Text 1',
    font:{fontSize:14, fontWeight:'bold'},
    color : 'blue',
    left:10
});
win.add(label1);

var label2 = Ti.UI.createLabel({
    text : 'Sample Text 2',
    font:{fontSize:14, fontWeight:'bold'},
    color : 'blue',
    left:10
});
win.add(label2);

var label3 = Ti.UI.createLabel({
    text : 'Sample Text 3',
    font:{fontSize:14, fontWeight:'bold'},
    color : 'blue',
    left:10
});
win.add(label3);

CODESTRONG

Monday, June 11, 2012

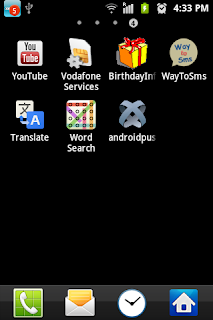
Appcelerator Cloud Push Notification in Android

This tutorial is based on Ti SDK 3.0.0, which is outdated. I have a new blog post based on Ti SDK 3.1.3GA using GCM.
What is Push Notification?
Push notification allows an app to notify you of new messages or events without the need to actually open the application, similar to how a text message will make a sound and pop up on your screen. This is a great way for apps to interact with us in the background, whether it be a game notifying us of some event occurring in our game world or simply the iPad's mail application beeping as a new message appears in our inbox. read more

Push Notification in Titanium Using Cloud Service
We can achieve Push Notification in Titanium using Appcelerator Cloud Service in 5 steps.
  1. Cloudpush Module Implementation
  2. Retrieve Device Token
  3. Cloud User Login
  4. Subscribe  a Channel
  5. Push Configuration
1)Cloudpush Module Implementation
Cloudpush provides methods for accessing Android push notifications from ACS using the MQTT protocol. require cloudpush in your app and add module in  your tiapp.xml

// add this line in tiapp.xml
<module platform="android">ti.cloudpush</module> 
// add this line in app.js
var CloudPush = require('ti.cloudpush'); 


2)Retrieve Device Token
You can Retrieve Device Token using below code
 
  CloudPush.retrieveDeviceToken({
          success: function deviceTokenSuccess(e) {
              alert('Device Token: ' + e.deviceToken);
              deviceToken = e.deviceToken
          },
          error: function deviceTokenError(e) {
              alert('Failed to register for push! ' + e.error);
       }
  });
 
3)Cloud User Login
Before subscribe for Push Notification, cloud user should logged in.
So create a test user in Appcelerator Cloud Console
My Apps -> Manage ACS ->  DEVELOPMENT ->  Users
and login with credential. Use below code for cloud user login

    Cloud.Users.login({
        login: 'push123',
        password: 'push123'
    }, function (e) {
        if (e.success) {
            alert("login success");
        } else {
            alert('Error: ' +((e.error && e.message) || JSON.stringify(e)));
        }
   });
4)Subscribe a Channel
Add following code for channel subscribtion

 
             Cloud.PushNotifications.subscribe({
                 channel: 'alert', // "alert" is channel name
                 device_token: deviceToken,
                 type: 'android'
             }, function (e){
                 if (e.success) {
                    alert('Subscribed for Push Notification!');
                 }else{
                     alert('Error:' +((e.error && e.message) || JSON.stringify(e)));
                 }
             });
 
5)Android Push Configuration
It is final step. In Appcelerator Cloud Console go to
My Apps -> Manage ACS -> DEVELOPMENT -> Settings/Android Push Configuration and enter the Application Package in the text box. Your pakage name should be similar to com.xxx.androidpush  Here xxx is company name and androidpush is Application name

Cool.., You have completed Android Push Notification setup(Here is the whole sample code). This time for testing, run the application in android device and click the button "Android Cloud Push Notification". You will get 3 alerts continuously.

Then go to My Apps -> Manage ACS -> DEVELOPMENT -> Push Notifications, here you can see "1 Android clients subscribed to push notifications"


It is time to send push notification, enter the values and hit the button "Send Push Notification" instantly you will receive notification in your Android device(with default icon and sound)

How to customize ACS Push notification?
Here you can use use your custom sounds and icons.

Icon

custom icons must be placed in below directory
App_root/platform/android/res/drawable/myicon.png 

Here "myicon.png" is custom icon, specified in the push message without the filename extension. For example: in icon text box enter the file name without extension(myicon)

Sound
Custom sound must be placed in below directory
app_root/platform/android/assets/sound/beep.wav 

Here "beep.wav" is custom sound, specified in the push message with the filename extension. For example: in custom sound text box you have to enter sound filename with extension(beep.wav). Here is the screens of custom notification

>

Here you can download the complete working project from my Github Appcelerator Titanium Android Push Notification

If anyone found difficulties in push notification implementation feel free to contact me

CodeStrong

Sunday, June 3, 2012

Appcelerator Cloud Service Custom Object and Query


Recently Appcelerator integrated cloud services with Titanium, in this post I am going to explain about bacics of Appcelerator Cloud Service(ACS)

What is Mobile Cloud Computing?
Mobile cloud computing is the usage of cloud computing in combination with mobile devices.
Cloud computing exists when tasks and data are kept on the internet(data are stored on servers at a remote location) rather than on individual devices, providing on-demand access.click here to know more

ACS Advantage
  • Create a server backed for your app instantly
  • Launch and scale your app automatically
  • No server coding or administration required
  • Scalability and Reliability
  • Flexibility
  • Reduced Cost
  • Increased Storage

What can we do with ACS?
Appcelerator provides around 15+ cloud services, among that few are

Standard(Tier 1)
  • Users
  • Files
  • Photos
  • Custom objects
  • Emails
  • Push notifications
Advanced(Tier 2)
  • Chats
  • Checkins
  • Events
  • Friends
  • Photo Collection
  • Places
  • Posts
  • Reviews
  • Message
  • Social integration

In this post I am going to explain how to 
  1. How to create cloud app?
  2. How to create cloud  user?
  3. How to create custom object?
  4. How to query custom object?
1. Create cloud App

Open your Titanium Studio and create a new ploject and make sure (Automatically cloud-enable this application should be checked)


After creating the project edit your tiapp.xml file you can see two(development, Production) set of cloud API keys. No need to worry about this it will be automatically mapped.

For example If run the App in simulator or Device it will use Development keys, If you create a signed pakage it will use Production keys.

Then login to Appcelerator cloud console and you can see yor newly created app

2.Create Cloud User

Include the ti.cloud module at top of your file then add below code to create a cloud User, Here I am creating a User with some sample data
   var Cloud = require('ti.cloud');
          Cloud.Users.create({
            username: "testuser1",
            password: "testuser1",
            password_confirmation: "testuser1",
            first_name: "test",
            last_name: "user1"
        }, function (e) {
            if (e.success) {
                var user = e.users[0];
                alert('Created! You are now logged in as ' + user.id);
                
            }
            else {
             if (e.error && e.message) {
                 alert('Error :' + e.message);   
             }
            }
            
        });
after creating a cloud user, the user will logged in automatically 
click Manage -> Development -> App Management -> Users
Here you can see the list of users, also you can edit the user detail

3.Create Custom Object

Cloud user can definec their own Custom Objects and object types, add beolow code to create a cloud custom object, before creating a custom object user must be logged in
    Cloud.Users.login({
      login  : 'testuser1',
      password: 'testuser1',
    }, function(e) {
      if (e.success)   {

        Cloud.Objects.create({
          classname : 'books',
          fields : {
            book_id : 1,
            title : 'Javascript',
            author : 'Peter'
          }
        }, function(e) {
          if(e.success) {
            alert("created");
          } else {
            alert('Error: ' + ((e.error && e.message) || JSON.stringify(e)));
          }
        }); 
                    
      } else {
        alert('Login Error:' +((e.error && e.message) || JSON.stringify(e)));
      } 
    }); 


click Manage -> Development -> App Management -> Custom Objects
Here you can see the list of custom objects, also you can edit the object


4. Query Custom Object

Here I am using three type of query
  if(e.index == 0){
   var params = {classname: "books",page: 1,per_page: 10}; // which is used for sellect object having classname = "books"
  }else if(e.index == 1){
   var params = {classname: "books",page: 1,per_page: 10, where: { author: "Peter"}};// which is used for sellect object WHERE author = 'Peter' and classname = "books"
  }else if(e.index == 2){
   var params = {classname: "books",page: 1,per_page: 10, where: { "book_id":{"$gte" : 2}}};// which is used for sellect object WHERE book_id > 2 and classname = "books"
  }

    Cloud.Objects.query(
     params
    , function(e) {
      if (e.success) {
                opLabel.text = JSON.stringify(e.books);
      } else {
                alert('Error: ' +((e.error && e.message) || JSON.stringify(e)));        
      } 
    })


Here you can download the complete working project from my Github account  Appcelerator Titanium Custom Object and Query


Thursday, May 17, 2012

Export CSV File in Titanium


One of my recent project I have exported tabular data into CSV file. In this post I will discuss about how to export CSV file in Appcelerator Titanium Application.

Here I have created a commonJS module for exporting tabular data into CSV file. The commonJs module function accept an argument and it export argument into CSV file.

The input argument(array) should be in following structure.
var input = [
    ["sample data 0", "sample data 1", "sample data 2"],
    ["sample data 0", "sample data 1", "sample data 2"],
    ["sample data 0", "sample data 1", "sample data 2"],
    ["sample data 0", "sample data 1", "sample data 2"]
];
In app.js add the below code
var csv = require('exportCsvData');

var win = Ti.UI.createWindow({
    backgroundColor:'#ccc',
    title:'CSV Import Module'
})

var createCsv = Titanium.UI.createButton({
    title:'Export CSV',
    top:'140',
    left:'110',
    height:'40',
    width:'115',
    color:'black'
});
win.add(createCsv);

win.open();

createCsv.addEventListener('click', function(e){
   var input = [
     ["sample data 0", "sample data 1", "sample data 2", "sample data 3"],
     ["sample data 0", "sample data 1", "sample data 2", "sample data 3"],
     ["sample data 0", "sample data 1", "sample data 2", "sample data 3"],
     ["sample data 0", "sample data 1", "sample data 2", "sample data 3"]
   ];
  
   var op = csv.exportCsvData(input);
   alert("Output file path = "+ op); 
});
Here is the code of exportCsvData.js which is a commonJS module
exports.exportCsvData = function(input)
{

    var rowTxt = "";
    for(var i=0;i < input.length; i++){ // row iteration
        for(var j = 0; j < input[i].length; j++){ // column iteration
            rowTxt += '"' + input[i][j] + '"';
 
            if(j < (input[i].length-1))
            {
                rowTxt += ',';
            }
        }
        rowTxt += '\n';// adding new line at end of row
    }

    // creating output file in application data directory
    var outputFile = Titanium.Filesystem.getFile(Titanium.Filesystem.applicationDataDirectory,'output.csv');
    // writing data in output file 
        outputFile.write(rowTxt); 


    if(outputFile.exists){
        alert("CSV generated!!!");
    }
    
    // return output file path
    return outputFile.nativePath;    
}

this module will return the output CSV file path

Wednesday, April 11, 2012

Google Geocode in Titanium Application

In my Titanium Application I have tried to use reverseGeocoder to find the current address (Street, City, State, Zip and Country) from the latitude and longitude.

But Ti reverseGeocoder does not return the exact address from the current latitude and longitude at all the time. It works only in few locations only.

So that I have move to Google Geocode API

Here is my sample code for how to use Google Geocode API in Titanium Application to get Street, City, State, Zip and Country value using latitude and longitude.

var addrUrl = "http://maps.googleapis.com/maps/api/geocode/json?sensor=true&latlng="+latitude+","+longitude;
/* web-service call */
var addrReq = Titanium.Network.createHTTPClient();
addrReq.open("GET",addrUrl);
addrReq.send(null);
 
addrReq.onload = function()
{
    var response = JSON.parse(this.responseText);
 
    if(response.status == "OK"){
        var resLen = response.results[0].address_components.length;
        for(var i=0; i < resLen; i++) {
            switch (response.results[0].address_components[i].types[0])
            {
                case "street_number":
                    Ti.API.info("street number : "+response.results[0].address_components[i].long_name);
                    break;
                case "route":
                    Ti.API.info("street name : "+response.results[0].address_components[i].long_name);
                    break;
                case "locality":
                    Ti.API.info("city name : "+response.results[0].address_components[i].long_name);
                    break;
                case "administrative_area_level_1":
                    Ti.API.info("state name : "+response.results[0].address_components[i].long_name);
                    break;
                case "postal_code":
                    Ti.API.info("zip code : "+response.results[0].address_components[i].long_name);
                    break;
                case "country":
                    Ti.API.info("country name : "+response.results[0].address_components[i].long_name);
                    break;
                }
        }
    }else{
        showAlert('','Unable to find Address');
    }
 
};

Wednesday, March 21, 2012

Titanium Android bottom tabgroup

Native android tab group is ALWAYS forced to the bottom by the OS (not by appcelerator). The following post explain how to achieve Bottom tabbar in Titanium(Android OS)

The first thing you want to remember is 90% of whatever you want to be changed using any native config, can be done in Ti by placing that file in the projects root, under whatever structer it was to have in native land. So if the file in a native app would be in '/foo/text.xml', in Ti you would place it in '%your apps project root%/foo/text.xml' Knowing that will help you with a lot of more advanced topics in Titanium dev.

Create a new project, and add the following xml into a file named 'titanium_tabgroup.xml' (without the quotes), inside a new project directory you will create called '%your apps project root%/platform/android/res/layout/' (again, without the quotes).

The XML you want to add is found in this gist

Then do a clean build of your app and run in android :)

Sample Output from Android Simulator

Here you can download the complete working project from my Github Android Bottom Tab Group

Reference Post : Matt Apperson Blog Post

Updated:

Bottom Tabgroup will be supported up to Titanium 3.0,  it will not be supported for Titanium 3.X  

Reason:

Before SDK 3.0, we used TabActivity to implement the TabGroup. Since TabActivity is deprecated, we now use TabHost to implement the TabGroup for API level < 11 in SDK 3.0. We define the TabHost layout in the code. That's why the custom TabHost layout xml file does not work anymore.
Based on the guideline of Pure Android, the bottom tab bars are not recommended. In addition, for API level >= 11 we use ActionBar to implement the TabGroup, in which case tab bars can only be on the top. In order to provide a consistent experience, we don't recommend using bottom tab bars.

AppC Jira Link : https://jira.appcelerator.org/browse/TIMOB-12220

Wednesday, March 7, 2012

Create Album and Post Photos in Facebook Using Appcelerator Titanium

STEP 1
User Need to be Loggedin with Facebook

STEP 2
Have to create a album using Graph API
Titanium.Facebook.requestWithGraphPath('me/albums', {name: albumTitle, message: albumDescription}, 'POST', function(e) {

// handle the response(response will have the album id)
   if(e.success) {
     if(e.result) {
        var response = JSON.parse(e.result);
        var album_id = response.id;
        var path = album_id+'/photos'; // Here response.id represents Album id
     }
   } else if(e.cancelled) {
       Ti.API.debug("user cancelled");
   } else {
       Ti.API.debug(e.result);
   }
});

STEP 3
Post photos to facebook using Graph API along with album id(which we got in previous step)

Before posting photos we have to convert photos into blob, Let assume I am having 3 images(1.jpg,2.jpg,3.jpg) inside the App_root/Resources folder. First we need to convert it into blob, then have to post it in facebook using Graph API

var aTitle = "Test Album";
var aDescription = "my description";
var media = [];      
for(var i=1; i<=3; i++){
   var file = Titanium.Filesystem.getFile(i+".jpg");
   var blob = file.read();
   media.push({'message': 'myPic', 'picture': blob});
}


var path = album_id+'/photos';

for (var m = 0; m < media.length; m++){
  Titanium.Facebook.requestWithGraphPath(path, media[m], 'POST', function(e){
     if (e.success) {
        //message = "Successfully posted in Facebook";
     } else {
        if (e.error) {
          //message = e.error;
        } else {
          //message = "Unkown result";
        }
    }
  });
}
alert("Successfully posted in Facebook");


Here is my working sample code at gist (Tested in iPhone)

Sunday, March 4, 2012

WebView in Appcelerator Titanium

The Titanium Web View allows you to open an HTML5 based view which can load either local or remote content. Here I am going to give example for both Local and remote content.

1. WebView with local content
Here I have added some sample text to webview, the 'html' property will accept the HTML content.

var win = Ti.UI.currentWindow;
var textContent = '
Hi this is the sample text from the webview
';
var localWebview = Titanium.UI.createWebView({
top:0,
left:10,
right:10,
html:textContent,
height:320,
width:320,
backgroundColor:'transparent',
touchEnabled:false
});
win.add(localWebview);

2. WebView with remote content
Here I have added some remote content into the webview, for example I am loading a Facebook page in webview.

var win = Ti.UI.currentWindow;
Ti.App.fireEvent('show_indicator'); //display loading spinner until webview gets loaded
var fbUrl = "http://www.facebook.com";
var extwebview = Titanium.UI.createWebView({
top:0,
left:0,
right:0,
url:fbUrl,
height:440,
width:320,
backgroundColor:'#ccc'
});
win.add(extwebview); //adding webview in current window

extwebview.addEventListener('load', function() {
Ti.App.fireEvent('hide_indicator'); //Hide the Loading indicator after the webview loaded
})

var space = Titanium.UI.createButton({
systemButton: Titanium.UI.iPhone.SystemButton.FLEXIBLE_SPACE
});

var buttonClose = Titanium.UI.createButton({
title:"Done",
style:Titanium.UI.iPhone.SystemButtonStyle.DONE
});

var bottomToolbar = Titanium.UI.createToolbar({
left : 0,
bottom: 0,
height : 40,
width : 320,
items: [space,space, space,space, space, space,buttonClose]
})
win.add(bottomToolbar); // add close button at the bottom tabbar to close the webview

buttonClose.addEventListener('click', function (e) {
win.remove(extwebview);
win.remove(bottomToolbar);
});