Ads

Showing posts with label Cloud. Show all posts

Sunday, September 30, 2012

Appc Mobile Dev Challenge App - ShareCar

My App(ShareCar) for Appcelerator Mobile Dev Challenge


A new Car Sharing service for commuters in India.

Simple and intuitive-to-use car sharing(carpooling) application empowers ride-sharing in real time within India. A ShareCar is a must have app which enables passengers or drivers to save money, commute, carbon emissions and reducing traffic congestion. This app helps you find interesting people in your neighborhood attending the same destination that you are heading to. Users can offer a ride to them or join their ride. Users can easily search, connect and organize their car share together, dividing the fuel cost. It lets you forge useful relationships with like-minded people. Simply use the journey planner to search the database by date and route. Using ShareCar user can share their ride information easily on Facebook.


Why Share?
  • Fuel is very expensive 
  • Control air pollution & go green
  • Save oil, time and money
  • Reduce traffic
  • Make new friends
  • Helps you, helps someone else

Key Features
  • Users can quickly and easily insert carpools(offer/request)
  • Intuitive messaging system
  • Easy overview and management of listings
  • Detailed user profile
  • Detailed search options for national travel (offer or request, trips by women for women, for smokers / non-smokers, etc.)
  • No limit on the number of rides you offer or take
  • Easily flip through with clear search result details

Technical Features
  • Support for Android and iOS 
  • Build by Appcelerator Titanium Framework
  • Backend - Appcelerator Cloud Services(ACS)
    [Cloud Users, Social Integration,  Custom Objects,  Photos, Messages]


Get connected, socialize, and save money and fuel.


Sunday, September 23, 2012

ACS Social Integration

Do you know, How to create ACS cloud user account using Facebook login?
Yes, we can do using ACS Social Integrations.

The external account login will create a ACS Services account if it hasn't been created, otherwise, it will login using the user who has the matching external account info.

STEP 1 - Facebook login in Titanium App 
Use below sample code for Facebook login

STEP 2 - Social Integration
After successfull login with Facebook, you will get Facebook accessToken, you can retrive this token using "Ti.Facebook.accessToken".

To integrate your facebook account with cloud, you need to pass three parameters to "Cloud.SocialIntegrations.externalAccountLogin" method,

id - External account's user id, optional for facebook. ACS server will obtain the uid using facebook token if id is missing
type - Type of the external account social media like Facebook, LinkedIn, Twitter(Currently only facebook token will be validated by the ACS server)
token - Token provided by the external account
add SocialIntegrations in Facebook login event listener

After the successful ACS Social Integrations go to
https://my.appcelerator.com/apps -> ypou-app -> Manage ACS -> Development -> Users
Here you will find a new cloud user account, which was created by external account login.

Other Methods
externalAccountLink - Associate an external account with an existing Appcelerator Cloud Services user account

externalAccountUnlink - Disassociate an external account from a Appcelerator Cloud Services user account.

searchFacebookFriends - Retrieves a list of Facebook Friends

References: 
http://docs.appcelerator.com/titanium/2.1/index.html#!/api/Titanium.Cloud.SocialIntegrations
https://cloud.appcelerator.com/docs/api/v1/social/loginexternal

Wednesday, July 4, 2012

Appcelerator Cloud Push Notification in iPhone


Push Notification in iOS Using Appcelerator Cloud Service

We can implement Push Notification in iOS using Appcelerator Cloud Service in 5 steps.
  1. Cloud User Login
  2. Retrieve Device Token
  3. Subscribe a Channel
  4. Push Certificates
  5. Push Configuration 

1)Cloud User Login
Create a test user in Appcelerator Cloud Console 
My Apps -> Manage ACS ->  DEVELOPMENT ->  Users
and login with credential. Use below code for cloud user login

Appcelerator Cloud Push Notification in iPhone

 
    var Cloud = require('ti.cloud');

    Cloud.Users.login({
        login: 'push123',
        password: 'push123'
    }, function (e) {
    if (e.success) {
    var user = e.users[0];
     alert("Loggin successfully");
        } else {
            alert("Error :"+e.message);
        }
    });
 
2)Retrieve Device Token
You can Retrieve Device Token using below code
 

    Titanium.Network.registerForPushNotifications({
        types: [
            Titanium.Network.NOTIFICATION_TYPE_BADGE,
            Titanium.Network.NOTIFICATION_TYPE_ALERT,
            Titanium.Network.NOTIFICATION_TYPE_SOUND
        ],
    success:function(e)
    {
        deviceToken = e.deviceToken;
        alert("deviceToken = "+deviceToken);
        registerForPush();
    },
    error:function(e)
    {
        alert("Error: "+e.message);
    },
    callback:function(e)
    {
        alert("push notification received"+JSON.stringify(e.data));
    }
    });


3)Subscribe a Channel
Add following code for channel subscribtion
 
    Cloud.PushNotifications.subscribe({
        channel: 'demo_alert',
        type:'ios',
        device_token: deviceToken
    }, function (e) {
        if (e.success) {
            alert('Success :'+((e.error && e.message) || JSON.stringify(e)));
        } else {
            alert('Error:' + ((e.error && e.message) || JSON.stringify(e)));
        }
    });

4)Push Certificates
It is most important part of this Tutotial, Appcelerator Doc clearly expained about how to create push certificates. http://cloud.appcelerator.com/docs/ios#push
Follow this section("Provisioning your Device for specialized Development") to create Development and Production Push certificates. Your certificates should be in .p12 format.

5)Push Configuration
After getting the push certificates(in my case I have created development push certificate), upload it in cloud console. 
My Apps -> Manage ACS ->  DEVELOPMENT ->  Settings -> Apple iOS Push Certificates

Appcelerator Cloud Push Notification in iPhone


Cool.., You have completed  Push Notification setup. This time for testing, run the application in iOS device and click the button "REGISTER PUSH NOTIFICATION". You will get 3 alerts continuously.

Then go to My Apps -> Manage ACS -> DEVELOPMENT -> Push Notifications, here you can see "1 iOS clients subscribed to push notifications"


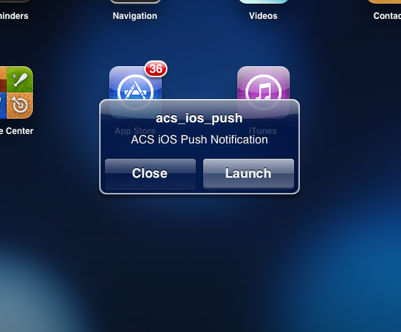
 It is time to send push notification, enter the values and hit the button "Send Push Notification" instantly you will receive notification in your iOS device(with default icon and sound)

Appcelerator Cloud Push Notification in iPhone
Push Notification in iPad

Appcelerator Cloud Push Notification in iPhone
Push Notification Callback


Here you can download the complete working project from my Github Appcelerator Titanium iOS Push Notification

If anyone found difficulties in push notification implementation feel free to contact me

CodeStrong


Monday, June 11, 2012

Appcelerator Cloud Push Notification in Android

This tutorial is based on Ti SDK 3.0.0, which is outdated. I have a new blog post based on Ti SDK 3.1.3GA using GCM.
What is Push Notification?
Push notification allows an app to notify you of new messages or events without the need to actually open the application, similar to how a text message will make a sound and pop up on your screen. This is a great way for apps to interact with us in the background, whether it be a game notifying us of some event occurring in our game world or simply the iPad's mail application beeping as a new message appears in our inbox. read more

Push Notification in Titanium Using Cloud Service
We can achieve Push Notification in Titanium using Appcelerator Cloud Service in 5 steps.
  1. Cloudpush Module Implementation
  2. Retrieve Device Token
  3. Cloud User Login
  4. Subscribe  a Channel
  5. Push Configuration
1)Cloudpush Module Implementation
Cloudpush provides methods for accessing Android push notifications from ACS using the MQTT protocol. require cloudpush in your app and add module in  your tiapp.xml

// add this line in tiapp.xml
<module platform="android">ti.cloudpush</module> 
// add this line in app.js
var CloudPush = require('ti.cloudpush'); 


2)Retrieve Device Token
You can Retrieve Device Token using below code
 
  CloudPush.retrieveDeviceToken({
          success: function deviceTokenSuccess(e) {
              alert('Device Token: ' + e.deviceToken);
              deviceToken = e.deviceToken
          },
          error: function deviceTokenError(e) {
              alert('Failed to register for push! ' + e.error);
       }
  });
 
3)Cloud User Login
Before subscribe for Push Notification, cloud user should logged in.
So create a test user in Appcelerator Cloud Console
My Apps -> Manage ACS ->  DEVELOPMENT ->  Users
and login with credential. Use below code for cloud user login

    Cloud.Users.login({
        login: 'push123',
        password: 'push123'
    }, function (e) {
        if (e.success) {
            alert("login success");
        } else {
            alert('Error: ' +((e.error && e.message) || JSON.stringify(e)));
        }
   });
4)Subscribe a Channel
Add following code for channel subscribtion

 
             Cloud.PushNotifications.subscribe({
                 channel: 'alert', // "alert" is channel name
                 device_token: deviceToken,
                 type: 'android'
             }, function (e){
                 if (e.success) {
                    alert('Subscribed for Push Notification!');
                 }else{
                     alert('Error:' +((e.error && e.message) || JSON.stringify(e)));
                 }
             });
 
5)Android Push Configuration
It is final step. In Appcelerator Cloud Console go to
My Apps -> Manage ACS -> DEVELOPMENT -> Settings/Android Push Configuration and enter the Application Package in the text box. Your pakage name should be similar to com.xxx.androidpush  Here xxx is company name and androidpush is Application name

Cool.., You have completed Android Push Notification setup(Here is the whole sample code). This time for testing, run the application in android device and click the button "Android Cloud Push Notification". You will get 3 alerts continuously.

Then go to My Apps -> Manage ACS -> DEVELOPMENT -> Push Notifications, here you can see "1 Android clients subscribed to push notifications"


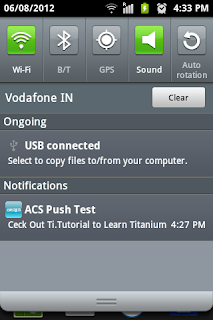
It is time to send push notification, enter the values and hit the button "Send Push Notification" instantly you will receive notification in your Android device(with default icon and sound)

How to customize ACS Push notification?
Here you can use use your custom sounds and icons.

Icon

custom icons must be placed in below directory
App_root/platform/android/res/drawable/myicon.png 

Here "myicon.png" is custom icon, specified in the push message without the filename extension. For example: in icon text box enter the file name without extension(myicon)

Sound
Custom sound must be placed in below directory
app_root/platform/android/assets/sound/beep.wav 

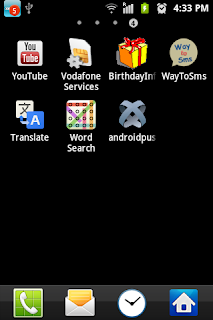
Here "beep.wav" is custom sound, specified in the push message with the filename extension. For example: in custom sound text box you have to enter sound filename with extension(beep.wav). Here is the screens of custom notification

>

Here you can download the complete working project from my Github Appcelerator Titanium Android Push Notification

If anyone found difficulties in push notification implementation feel free to contact me

CodeStrong

Sunday, June 3, 2012

Appcelerator Cloud Service Custom Object and Query


Recently Appcelerator integrated cloud services with Titanium, in this post I am going to explain about bacics of Appcelerator Cloud Service(ACS)

What is Mobile Cloud Computing?
Mobile cloud computing is the usage of cloud computing in combination with mobile devices.
Cloud computing exists when tasks and data are kept on the internet(data are stored on servers at a remote location) rather than on individual devices, providing on-demand access.click here to know more

ACS Advantage
  • Create a server backed for your app instantly
  • Launch and scale your app automatically
  • No server coding or administration required
  • Scalability and Reliability
  • Flexibility
  • Reduced Cost
  • Increased Storage

What can we do with ACS?
Appcelerator provides around 15+ cloud services, among that few are

Standard(Tier 1)
  • Users
  • Files
  • Photos
  • Custom objects
  • Emails
  • Push notifications
Advanced(Tier 2)
  • Chats
  • Checkins
  • Events
  • Friends
  • Photo Collection
  • Places
  • Posts
  • Reviews
  • Message
  • Social integration

In this post I am going to explain how to 
  1. How to create cloud app?
  2. How to create cloud  user?
  3. How to create custom object?
  4. How to query custom object?
1. Create cloud App

Open your Titanium Studio and create a new ploject and make sure (Automatically cloud-enable this application should be checked)


After creating the project edit your tiapp.xml file you can see two(development, Production) set of cloud API keys. No need to worry about this it will be automatically mapped.

For example If run the App in simulator or Device it will use Development keys, If you create a signed pakage it will use Production keys.

Then login to Appcelerator cloud console and you can see yor newly created app

2.Create Cloud User

Include the ti.cloud module at top of your file then add below code to create a cloud User, Here I am creating a User with some sample data
   var Cloud = require('ti.cloud');
          Cloud.Users.create({
            username: "testuser1",
            password: "testuser1",
            password_confirmation: "testuser1",
            first_name: "test",
            last_name: "user1"
        }, function (e) {
            if (e.success) {
                var user = e.users[0];
                alert('Created! You are now logged in as ' + user.id);
                
            }
            else {
             if (e.error && e.message) {
                 alert('Error :' + e.message);   
             }
            }
            
        });
after creating a cloud user, the user will logged in automatically 
click Manage -> Development -> App Management -> Users
Here you can see the list of users, also you can edit the user detail

3.Create Custom Object

Cloud user can definec their own Custom Objects and object types, add beolow code to create a cloud custom object, before creating a custom object user must be logged in
    Cloud.Users.login({
      login  : 'testuser1',
      password: 'testuser1',
    }, function(e) {
      if (e.success)   {

        Cloud.Objects.create({
          classname : 'books',
          fields : {
            book_id : 1,
            title : 'Javascript',
            author : 'Peter'
          }
        }, function(e) {
          if(e.success) {
            alert("created");
          } else {
            alert('Error: ' + ((e.error && e.message) || JSON.stringify(e)));
          }
        }); 
                    
      } else {
        alert('Login Error:' +((e.error && e.message) || JSON.stringify(e)));
      } 
    }); 


click Manage -> Development -> App Management -> Custom Objects
Here you can see the list of custom objects, also you can edit the object


4. Query Custom Object

Here I am using three type of query
  if(e.index == 0){
   var params = {classname: "books",page: 1,per_page: 10}; // which is used for sellect object having classname = "books"
  }else if(e.index == 1){
   var params = {classname: "books",page: 1,per_page: 10, where: { author: "Peter"}};// which is used for sellect object WHERE author = 'Peter' and classname = "books"
  }else if(e.index == 2){
   var params = {classname: "books",page: 1,per_page: 10, where: { "book_id":{"$gte" : 2}}};// which is used for sellect object WHERE book_id > 2 and classname = "books"
  }

    Cloud.Objects.query(
     params
    , function(e) {
      if (e.success) {
                opLabel.text = JSON.stringify(e.books);
      } else {
                alert('Error: ' +((e.error && e.message) || JSON.stringify(e)));        
      } 
    })


Here you can download the complete working project from my Github account  Appcelerator Titanium Custom Object and Query