Ads

Wednesday, September 11, 2013

Audio Recorder Module

Audio Recorder module helps to record audio without using intent in Android. Using this module we can record audio in different format like(mp4,3gp) without help of intent. This module uses MediaRecorder class to record audio.

Titanium Audio Recorder Module

Features and Benefits
  • File format
    Module support for both mp4 and 3gp formats.
  • Audio Encoders
    Module support for following audio encoder types AAC, AMR_NB, AMR_WB, DEFAULT
  • External Storage
    It saves output file in external storage inside the specified directory
  • maxDuration
    Option to stop the recording session after the specified duration
  • maxFileSize
    Option to stop the recording session after the specified file size

Usage:
var audioRecorder = require("titutorial.audiorecorder");

audioRecorder.startRecording({
    outputFormat : audioRecorder.OutputFormat_THREE_GPP,
    audioEncoder : audioRecorder.AudioEncoder_AMR_NB,
    directoryName : "testdir",
    fileName : "testfile",
    maxFileSize : 7000,
    success : function(e) {
        alert("success => " + e.filePath);
        Ti.API.info("response is => " + JSON.stringify(e));
        var audioDir = Titanium.Filesystem.getFile(Titanium.Filesystem.externalStorageDirectory, "testdir");
        var audioFile = Ti.Filesystem.getFile(audioDir.resolve(), e.fileName);
        Ti.API.info("audioFile.nativePath = " + audioFile.nativePath);
    },
    error : function(d) {
        alert("error => " + e.message);
        Ti.API.info("error is => " + JSON.stringify(d));
    }
});

Download:
Module: https://marketplace.appcelerator.com/apps/6516?1532012201
Source Code: https://github.com/railskarthi/AudioRecorder

iPhone NavigationGroup in Alloy

In this post I am going to share how to use iPhone NavigationGroup in Alloy project.

In Titanium this method used to create the NavigationGroup. Following example also covers below things
  • Creating NavigationGroup
  • Opening a new window in NavigationGroup
  • Closing NavigationGroup
 
iPhone NavigationGroup Example

 Example App: https://github.com/TiTutorial/alloy_navigation_group

Thursday, August 29, 2013

RatingBar Module - Android

RatingBar is an extension that shows a rating in stars. The user can touch/drag to set the rating when using RatingBar.

This module converts native Android RatingBar widget to Titanium component.

Features:
  • Touch/Drag Rating
    User can touch/drag to set the rating when using RatingBar.
  • Number of stars
    User can customize no of stars (or rating items) in RatingBar using using setStars method.
  • stepSize
    User can sets the step size (granularity) of this RatingBar
  • setIsIndicator
    User can sets whether this rating bar is an indicator (and non-changeable by the user).
Using Custom Resources:
If you want to use custom resource in your App you can override default resource. For that you have to place your custom resource inside app_root/platform/android/res or app_root/modules/android/titutorial.ratingbar/0.1/platform/android/res in the same name.

For example, if you want to override star_on image you have to override your custom image with the same name star_on.png

Usage:
var win = Ti.UI.createWindow({
 backgroundColor:'#fff',
 layout : 'vertical'
});

var ratingbar = require('titutorial.ratingbar');

var setRatingButton = Ti.UI.createButton({
 title : 'Set rating 6',
 height : '40dp',
 width : Ti.UI.SIZE,
 top : '30dp'
});
win.add(setRatingButton);

/*
 * Dynamic rating bar
 */
var ratingBar1 = ratingbar.createRatingBar({
 top : '30dp',
 left:15,
 rating : 2,
 stars : 6,
 stepSize : 1.5,
 isIndicator : false
});
win.add(ratingBar1);

var ratingValue = Ti.UI.createLabel({
 text : 'Rating Value : '+ratingBar1.getRating(),
 color : '#000',
 font : {fontSize:'20dp'},
 height : Ti.UI.SIZE,
 width : Ti.UI.SIZE,
 top : '30dp',
 textAlign : 'center'
});
win.add(ratingValue);

ratingBar1.addEventListener('change', function(e) {
 ratingValue.text = "Rating Value : "+e.rating.toString();
});

/*
 * Static rating bar
 */
var ratingBar2 = ratingbar.createRatingBar({
 top : '30dp',
 left:15,
 rating : 3,
 stars : 5,
 stepSize : 1,
 isIndicator : true
});
win.add(ratingBar2);

setRatingButton.addEventListener('click', function() {
 ratingBar1.setRating(6.0);
});

win.open(); 

Download:
Module: https://marketplace.appcelerator.com/apps/6371?1827333944
Source Code: https://github.com/railskarthi/ratingbar

Screenshot:
Titanium RatingBar Module
 

Wednesday, August 7, 2013

Android YouTube Player

Android module that plays videos from YouTube.

This module create an Android activity that allows developers to play videos that are hosted on YouTube. This module is based on Android YouTube player library.

The original code was created by KeyesLabs (www.keyeslabs.com) as part of the Screebl project. The developers wanted the ability to play YouTube-hosted help videos, and wanted those videos to be able to play on any device, even those that didn't have the stock YouTube player app.

Android YouTube Player
NOTE: If module unable to get the RTSP url from YouTube server, then video cannot be played.

Features:
  • Higher Bandwidth Video
    This module plays higher bandwidth video from YouTube server as new Activity.
  • Auto Play
    Without user interaction, video will will play automatically in landscape mode once it is loaded from YouTube server.
  • Video Player Controls
    YouTube video player comes with default controls like play, pause, SeekForward, SeekBackward.
  • Play by Video Id and Playlist Id
    playVideo method takes video id as input parameter and plays video automatcally.
    playPlayListVideo
    method takes playlist id as input parameter then it will play the latest video added to a YouTube playlist.
Usage:
var win = Ti.UI.createWindow({
 backgroundColor : "#fff",
 layout : "vertical"
});

var youtubePlayer = require('titutorial.youtubeplayer');
Ti.API.info("module is => " + youtubePlayer);

/*
 * Play video by videoId
 */
var playVideo = Ti.UI.createButton({
 title : 'Play video',
 height : '40dp',
 width : Ti.UI.SIZE,
 top : '100dp'
});
win.add(playVideo);

playVideo.addEventListener('click', function() {
 youtubePlayer.playVideo("FjMs_imWkFM");
});

/*
 * Play video by playListId
 */
var playPlayListVideo = Ti.UI.createButton({
 title : 'Play playlist video',
 height : '40dp',
 width : Ti.UI.SIZE,
 top : '100dp'
});

playPlayListVideo.addEventListener('click', function() {
 youtubePlayer.playPlayListVideo("PLB03EA9545DD188C3");
});

win.add(playPlayListVideo);

win.open();
Download:
Module: https://marketplace.appcelerator.com/apps/6223?942520925
Source code: https://github.com/railskarthi/YoutubePlayer-Android

Screenshot:
Android YouTube Player
 

Sunday, June 9, 2013

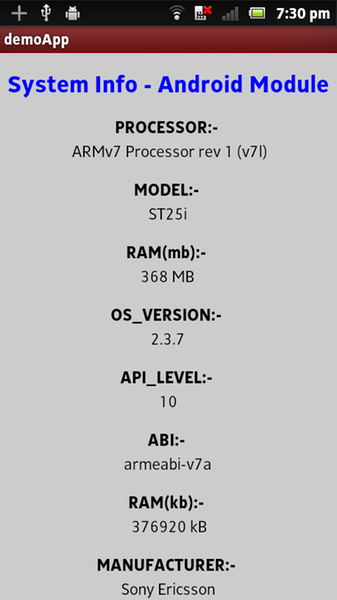
Android System Info Module

Recently I developed an native module called Android System Info Module and published in Appcelerator Marketplace.

Android System Info Module in AppC Marketplace

This module used to get the basic Android system information.

Using this module we can get system information like
  •  OS VERSION
  •  API LEVEL
  •  HARDWARE MANUFACTURER
  •  DEVICE
  •  MODEL
  •  SYSTEM RAM(both in kb and mb)
  •  ABI
  •  PROCESSOR 

Accessing the Android System Info Module

To access this module from JavaScript, you would do the following:
var systeminfo = require("titutorial.sysinfo");  

Usage
var systeminfo = require('titutorial.sysinfo');
var infoStr = systeminfo.getInfo(); //response would be string 
var infoObj = JSON.parse(infoStr);  //parsing string to JSON object
Ti.API.info("infoObj obj => " + infoObj);

Sample Response
var sampleResponse = {
     PROCESSOR: "ARMV7 Processor rev 1 (v71)",
     MODEL: "ST25i",
     RAM(mb): "368 mb",
     RAM(kb): "376920 kb",
     OS_VERSION: "2.3.7",
     API_LEVEL : "10",
     ABI : "armeabi-v7a",
     MANUFACTURER : "Sony Ericsson"
};
Android System info Module Example app
Module URL : https://marketplace.appcelerator.com/apps/5770?1412283645